Outriggers are essential for serious trolling, yet far too many owners of small and midsize boats don’t realize how to get the most out of them. Rather, they’ll add the poles to look the part and only utilize them in a basic fashion.
Outriggers serve two distinct purposes. They position baits outward, into clean water, while spreading them apart; this clears space within the spread for additional lines. Outriggers also provide a built-in drop-back — extra seconds for a billfish or even a dolphin or tuna to consume a bait and become solidly hooked — as well as the option to continue dropping back, if necessary.
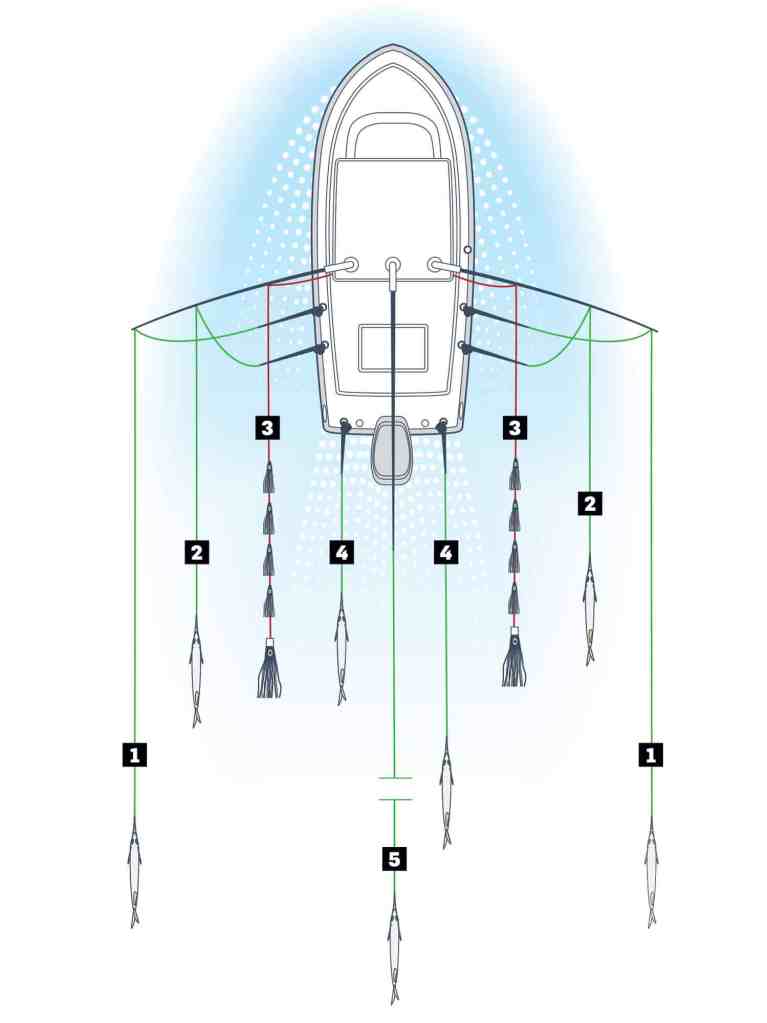
On the midsize center consoles I grew up fishing, and now on my 33-footer, outriggers have helped me build a wide array of potent trolling spreads, some incorporating teasers and dredges. How elaborate will outriggers let us get? I have a pair of 16-foot (extra-strong) Lee’s Sidewinder outriggers and a 12-foot center rigger. Each pole is rigged for trolling two baits, with release clips on independent halyards. The main outriggers are also set to pull teasers (more on this in a bit). Therefore, between my two primary outriggers, we can troll a total of four baits and two teasers: two baits and a teaser from the port outrigger, and two baits and a teaser from the starboard one. The high release clip on my center rigger is for the longest bait. A lower optional clip puts a bait in the middle of the spread, where the prop wash fades into clean water. Add a pair of flat lines off the transom, along with a dredge from each transom corner, and I have the capability to troll an eight-line spread augmented by surface and subsurface teasers.
SIZE MATTERS
Outrigger length dictates the distance at which baits ride outboard of the boat, but don’t get carried away, particularly if you trailer. My 16-foot poles are ideal in that they sufficiently spread baits out and to the sides. When retracted (in the running position), the poles extend a bit beyond the outboards. This compactness is beneficial for trailering, docking in tight confines, or when parking the boat on its trailer against a building. The goal is to choose a pole with just enough length to position baits in clean water, as well as provide maximum distance between port and starboard-side baits to populate the middle of the spread with flat and center rigger lines. Another big consideration is durability. The less weight and hardware on top, the better the poles and top will handle the stress of high-speed and rough-water runs.
HEIGHT AND ANGLE
Topside outriggers offer at least a couple of height positions, with some offering up to five: zero, 15, 30, 45 and 60 degrees. Naturally, the rigger poles can be lowered flat to the top for trailering, clearing bridges and storing the vessel. Yet bait-spread performance can be fine-tuned even more through angle adjustment.
Light surface baits such as skipping ballyhoo and small lures benefit from the highest positions; the line’s sharper angle of entry elevates the heads of these baits, enhancing their performance at slower trolling speeds. Conversely, subsurface baits, such as swimming ballyhoo, mullet, and concave and jet-head lures, benefit from a less aggressive angle of entry. Therefore, 15- to 30-degree positions are as conducive to top performance as is fishing them from the short outrigger clips, which reduces line angle. I usually settle on an all-around angle of 30 or 45 degrees. Experiment, especially under varying sea conditions, and you’ll discover the most effective angle for the conditions.
BELLS AND WHISTLES
We commonly pull teasers — daisy chains, hookless lures or spreader bars — from a pair of Elec-Tra-Mate TR-310 Teezer reels mounted to the underside of my T-top. The 300-pound mono teaser line runs through the middle eyelet of both the port and starboard outrigger poles, finished off with a cork stop and large ball-bearing snap swivel. These midsize-boat-friendly teaser reels enhance activity and create panicked bait illusions close to the boat, particularly in conjunction with transom dredges. In fact, with daisy chains, we’ve picked away at large schools of dolphin by winding them up until the lead plastic squid or mullet barely remains in the water. By leaving just one outboard in gear and holding a straight heading, we get the dolphin to follow the teasers like the Pied Piper; we simply cast cut baits on spinning tackle and catch dinner.

QUICK DEPLOYMENTS
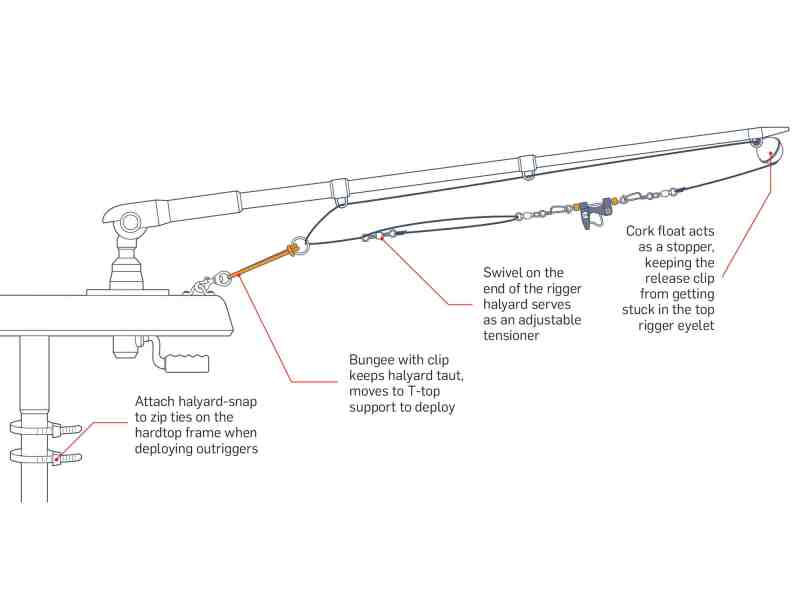
Despite the popularity of telescoping poles, the rigging system I’ve been using for a couple of decades is hard to beat for center consoles. It lets me deploy my outriggers within minutes. Each pole has two independent pin-style release clips (excellent for live baits, yet with firm enough settings to pull lures and large natural baits) on separate black nylon-braid halyards. One cord runs through all rigger-pole eyes (for long baits), and the “short” cord goes through all but the top eye. I prefer nylon braid over mono because it weathers the elements better and provides a firmer “bite” for my adjustment swivels. Each line runs through a stainless ring affixed to a bungee, clipped to an eyelet on my T-top.
Prior to leaving the dock, I raise the outrigger poles. The halyards are loosened via tensioning slides made from swivels and re-affixed from above the T-top to a stanchion underneath the T-top, where we easily reach and load the release clips. When ready to troll, I slow the boat and swing the poles outward. Any loosening or tightening of the cords is quickly accomplished with the tensioning slides. If I’m using teasers, they go out first, followed by the long outrigger baits, then the short baits. The long center-rigger bait goes out next, followed by its short bait, if desired.
From there, we tinker with bait positions and speed until the spread looks appealing. When it’s time to run, the baits come in, outrigger clips closed and poles swing inward and are locked in position. Once we’re through for the day, we fasten the halyards above the T-top (to prevent cord chafing along the edge of the top) and run in. Before trailering, the center rigger is removed, and outriggers are lowered flat with the T-top. All halyards are tightened to withstand trailering speeds. Maximizing the attraction of a bait spread is an art, involving the deployment of numerous baits, precise positioning and the right speed to make them come alive. A set of dialed-in outriggers create the illusion of a fleeing school of bait that elicits strikes from predators, often out of instinct and not necessarily hunger.
TEASER-REEL POINTERS FOR MIDSIZE BOATS
A. Spool 50 to 100 yards of 20-pound-test monofilament onto each teaser reel as backing.
B. Add a small barrel swivel on the end of the backing and attach enough 250- or 300-pound-test mono to fill each reel. The reason for the light backing is that, should a fish become tangled in a teaser line or consume a teaser and race off, the light mono will part, saving the outrigger pole from buckling.
C. Slide on a round float as a stopper, then crimp a ball-bearing snap swivel to the end of the teaser line. The float keeps the swivel from retracting through the outrigger eyelet.
D. Run the teaser line through the line guide on the reel, or one affixed to the T-top, then through the outrigger eyelets. Set the drag on teaser reels just firmly enough to prevent slippage, but still lightly enough for a fish to strip off line in the event it grabs the teaser.
E. Keep snap swivels attached to each teaser line when not in use. This will make teaser deployment easy.
F. When stowing outriggers, remove teasers by winding them in enough to reach with a gaff and hauling them on board. Back off teaser-reel drags and secure the swivels to each teaser reel. Take up the slack and tighten the teaser drags.
G. When fighting fish, lift teasers out of the water to dangle underneath their poles. This provides clearance should a fish charge off laterally.