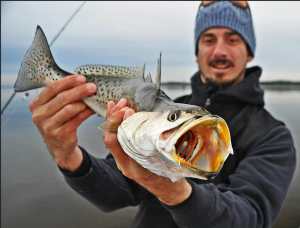
Despite the fact they are commonly targeted by predatory species along the California coast, saltwater sculpin are often underlooked by fly-fishers. Yet smaller specimens are perfect baits for many game fish that inhabit the rocky shoreline, including calico bass, sand bass, rockfish and halibut.
Sculpin are not very glamorous creatures. They are considered the most venomous species of scorpion fish found in Californian waters. Their outer dorsal, pelvic and anal fins are spiked with glands capable of inflicting a very painful sting, and the best way to handle a sculpin, should you catch one, is to lip it prior to removing the hook, keeping clear of its outer spines.
These fish are commonly found along shallow rocky bottom, rock piles, reefs, inshore jetties and break walls. Their spiked heads are large compared to the rest of their bodies, and when splayed, their pectoral fins look like tiny wings, which they use to crawl and skip along the rocks. A sculpin’s color may vary from green to tan to brown to orange to red, and their underbellies are mostly off-white or light tan.
Creating the Sculpin Fly
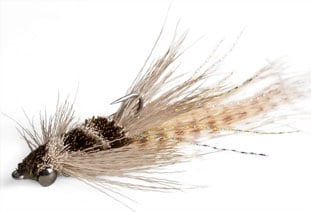
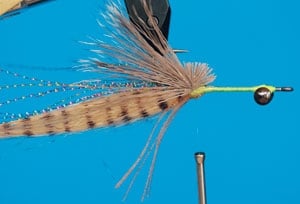
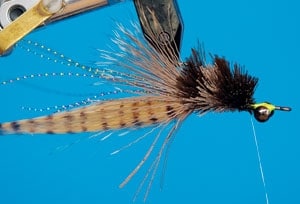
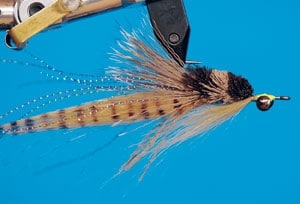
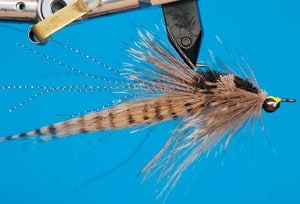
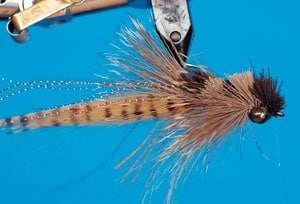
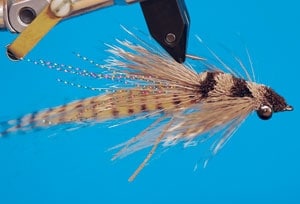
The inspiration for this pattern began with the Borski Slider, a personal favorite of mine that works quite well on its own. The Slider technique I incorporated was the high-tie spinning method used to secure natural deer hair atop the hook shank. This helps turn a fly upright, Clouser-style, reducing the risk of snags. The Sculpin fly is different than a Slider, however, in its larger profile, mottled coloration, pectoral fins and light underbody. They are fun to tie and not as difficult as they look.
So how do you make one? I always begin a new pattern by studying the actual bait to identify its most obvious characteristics. In the case of the sculpin, a bulky head and pectoral fins seemed the most prominent features.
Deer hair, being hollow, is a great material to spin, trim and stack in different colors. Its webby tips pulsate when retrieved and flare easily, resembling pectorals, though marabou or webby feathers can also achieve the same effect.
To create the fly, I start by tying in some large Dazzle dumbbell eyes and a long piece of Extra Select Craft Fur at the bend of the hook. I like this material because its length allows the creation of a larger pattern. It also breathes well and undulates in the current. Adding barred side bands can be accomplished with a brown or purple waterproof Sharpie or by tying in a grizzly hackle on both sides of the craft fur. I usually add a few strands of rainbow Krystal Flash as well, and a few Loco Legs that hang below for additional movement.
The body of the Sculpin fly is composed of two tones of deer hair. For contrast, try using both light and dark shades. The first bunch of deer hair is tied directly atop the shank, allowing the tips to extend past the hook bend. Use two soft wraps to hold the deer hair in place, then pull straight down, ensuring the material stays on top and doesn’t spin around the shank. Always add a few wraps in front of each tie. For the second tie, use deer hair of a different color and trim it on both ends. Repeat this process until about a quarter inch behind the eyes. Then trim to make room for the pectorals.
Using a small clump of deer hair, measure the length from just behind the eyes to the bend of the hook. Tie the pectorals on both sides of the fly, letting the tips flare outward. Then flip the fly over, trim excess deer hair and tie in a wool or craft-fur underbelly. Flip the pattern back over and complete by repeating the top’s spun deer hair until reaching the eye of the hook. Trim and add Tuffleye or epoxy under the eyes and head of the fly for a durable finish.
Fishing the Sculpin Fly
Sculpin live in tough neighborhoods, and losing a few flies is part of the game, so always take a handful along. When fishing jetties or rock walls from a boat, I prefer casting parallel to the structure. Count the fly down according to depth. If casting directly perpendicular to the jetty, retrieve slowly so the fly can stair-step the outer contour of the rock pile.
Most jetties flare outward, so always try to maintain contact with the fly to minimize snags. Large Dazzle eyes will get the pattern pointing downward between strips, and I prefer attaching my flies with a nonslip mono loop. This knot enables the fly to swing freely and sink without any drag.
Odds are, you will get eaten between strips when the fly is on the fall. If you don’t hang up occasionally while fishing this fly, you’re not fishing close enough to the bottom. When fishing around rocks, flourocarbon leaders will help the fly sink, and they’re also more abrasion-resistant than mono.
I believe that bigger flies catch bigger fish, so don’t be afraid to experiment when tying these Sculpins in larger sizes. Sculpin have been around a long time, and trust me, big bass love to crush them!
Materials
HOOK: Mustad S74SZ-34011, 2XH/4XL
**EYES: **Large Dazzle eyes, quarter ounce
**THREAD: **Monofilament
**TAIL: **Extra Select Craft Fur with Loco Legs and rainbow Krystal Flash
**BODY: **Spun deer hair
**UNDERBODY: **Wool or craft fur
**FINISH: **Tuffleye or epoxy
Tying Instructions
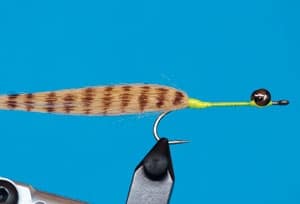
| Step 1: Begin by tying on large Dazzle eyes and craft fur at the bend of the hook. I like to mottle the craft fur with a Sharpie at this stage. | ** |
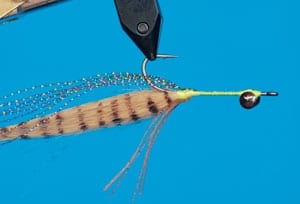
| | **Step 2: Flip the fly and add a few strands of rainbow Krystal Flash on top and four rubber Loco Legs below.| **
| | **Step 3: Tie first clump of deer hair, tips facing back, past the hook bend. Make sure the hair stays on top of the shank and doesn’t spin. | **
| | **Step 4: Trim second clump of deer hair on both ends before tying onto the top of the shank. Alternate between dark and light shades.| **
| | **Step 5: Trim hair, leaving space behind eyes for pectorals. Flip fly, and tie in wool or craft-fur underbelly.| **
| | **Step 6: Tie in deer-hair pectorals, allowing the tips to flare on both sides toward the rear.| **
| | **Step 7: Tie two more stages of deer hair on top, allowing space to whip-finish the head.|
| | Step 8: Trim excess deer hair and finish with epoxy or Tuffleye for long-evity and durability.|
|