stripping basket
Aside from my basic tackle setup, the item I would never leave behind on any fishing trip is a stripping basket. It serves many functions and resolves a litany of mishaps. Anything line can coil around will cause a tangle. A lone stalk of grass or strand of seaweed, a pebble the size of a walnut, a broken clamshell, twigs, shoelaces and a thousand other seemingly innocuous items invite line snarls and tangles. Even if your line falls on water that is free of debris, the surface will hold the line like a magnet and your forward cast will be robbed of considerable distance. The situation can worsen when current pulls the line opposite the direction you are trying to cast.
Wading poses the greatest obstacles, but fishing from boats, even those with clutter-free decks designed for fly-fishing, presents challenges if the line is not managed. I’m hard-pressed to recall a saltwater outing when there wasn’t at least a little breeze in the air, which is enough to blow fly line into places it shouldn’t be. Misplacing your feet is problematic as well. Even when barefoot, I can be standing on the line and not know it, causing the cast to come to a premature and abrupt end. The casting phase of the game isn’t the only part that can be impacted; dire consequences can also ensue when you hook a fish and the line is not free and clear. My friend lost contact with a substantial blue marlin when the line shot up from the deck and caught a boat cleat. I lost what would have been my second bluefin tuna on fly when a section of the running line was pinned under my foot. This situation was doubly sad because I had my stripping basket with me but neglected to put it on again after switching setups.
**
Managing Line**
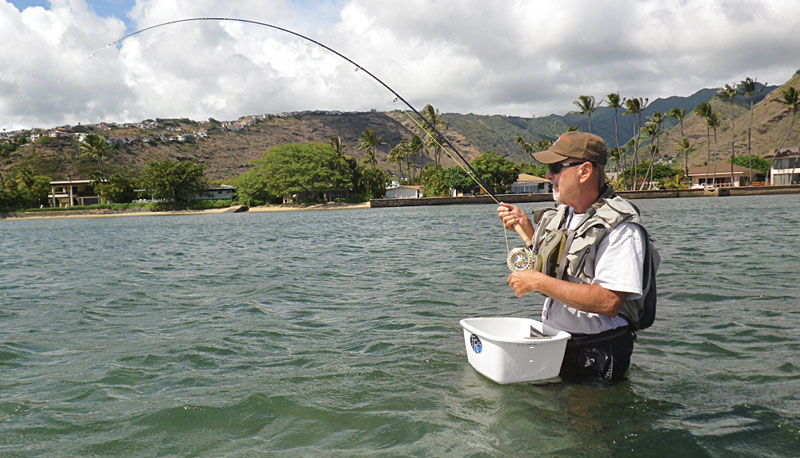
Nowadays, more and more fly-fishers angling from boats use what Dan Blanton refers to as VLMDs (vertical line-management devices). These are buckets,approximately knee-height, designed to hold fly and running lines. There are some commercially available, like the Beachcomber FlyLine Tamer from Pro-Trim and the Bucket II from Sea Level Flyfishing. These vertical buckets are what I choose when fly-fishing from a boat. If they aren’t available and when I’m wade-fishing, I go with the tried-and-true stripping basket. These too are commercially available, but I actually prefer the ones I make myself.
In addition to the money you’ll save, the advantage to making your own is that you can customize them to your specific needs. If you fish in a variety of locales, you’ll find that no one particular basket will ideally suit every situation. For example, in the surf, I definitely want a basket that allows water to drain, so all my beach baskets have holes in them. There are places, like Hawaii, where I may wade waist-deep. In these situations, I don’t want any water seeping into the basket, so I make sure it’s watertight. The more line you are working with, the greater the chance for tangles; to offset this, you may consider a slightly larger (deeper, wider, longer) basket.
For most of the conditions I face, I use a basket that measures approximately 6 inches deep, with a 14-by-12-inch inside surface area. This is the general size of most rectangular plastic dishpans sold in supermarkets and hardware and department stores. For making 100-foot-plus casts with a double-handed rod, I use a slighter larger basket that is 10 inches deep, with basically the same surface area. For years off the beaches in Southern California, when fishing single-handed 6- and 8-weight rods, I used a plastic wastepaper basket that was approximately 12 inches deep, with a 7½-by-10-inch surface area. This was attached to the side of my hip, and I made single-hand strips so the line fell directly into the basket. With rectangular baskets, you can make single-hand or hand-over-hand retrieves. For the latter stripping motion, it’s best to have the basket situated in front of your midsection.
The important point is to use a size and placement that you are comfortable with. If you have never used a basket before, it may seem somewhat awkward at first, and you may feel preoccupied with making sure the line falls into the container. But spend a little time with it, and you’ll find that the basket blends seamlessly with your fishing.
**
Spiking Your Basket**
Regardless of the basket’s dimensions, the one feature you want to incorporate is a series of relatively flexible spikes projecting up from the bottom. A bare-bottom basket is better than no container at all, but you’ll find that the least bit of movement on your part will cause the line to foul in the basket. Finger-like spikes will help prevent this. Large-diameter monofilament strands, such as from commercially available weed-trimming lines, are ideal for this. I generally cut sections that are 2½ to 4½ inches long and have found that six to eight spikes evenly spaced on the bottom of the basket are all that’s needed. A good alternative to the monofilament strands is plastic cable ties, which are available in a variety of lengths and thicknesses. Prior to inserting monofilament spikes up through the holes I make in the bottom of the basket, I flatten the bottom end of each spike with a heated knife so it will seat flat against the basket’s underside. You can use Goop or hot glue to seal the spikes in place. A drill or heated nail can be used to make holes in the basket’s bottom. If you use cable ties for the projections, two holes approximately a quarter-inch apart will be required for each cable tie. Insert the tag end through the hole from inside the basket and then up through the second hole. All that’s left is to slip the tag end into the cable tie’s base and pull it all the way through until it’s tight against the base. Once again, if you wish to seal these holes, Goop or hot glue will work great.
Putting It On
There are two ways to fasten the basket around your waist — a belt or a bungee cord. If you opt for a belt, get one designed for wading, with a plastic quick-release buckle. You will need two slits along the basket to accommodate the belt, and the best way I’ve found of making these is with a heated knife blade. Just proceed slowly. It may be necessary to reheat the blade several times to make a neat slit. For bungee cords, all you need are two holes, one on either side of the top lip section of the basket, to accommodate the hooks at the tag ends of the cord. For sizing with bungee cord, be sure to figure in the width between the holes in the basket. For example, a 30-inch cord may be way too short to go around your waist, but if you add in the width between the holes (11 inches, as an example), you may have a perfect fit. Given the simplicity and utility of these containers, don’t be a basketless case on your next outing.