The thought of rigging for big fish like sailfish intimidates many people. But if you look closely, the connections only appear to be complicated; you’ll discover that with a few special knots and some practice, you can set up your rod and reel with confidence.
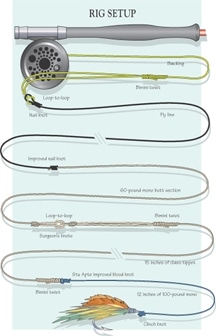
**Backing to Fly Line
**Starting with the backing and moving forward, first form a loop in your backing by tying a Bimini twist in it. Make sure the loop is large enough to pass the reel through, and then make a loop in the end of your fly line, too. You can do this in several ways, including whipping a loop using Kevlar thread or tying three or four small opposing nail knots. You can also simply buy a billfish line that already has loops in it. Either way, once these loops are created you simply loop-to-loop them together.
**The Leader
**For the butt section of my billfish leaders, I attach 60-pound-test-monofilament to the fly line with an improved nail knot. I make these about 2 feet long, including the large loop at the end. To make this loop, I leave a minimum of an extra foot of butt material and then tie either a double surgeon’s knot or a perfection loop, leaving at least a 31¼2-inch loop to provide clearance for easily passing a big billfish fly, often with tandem 6/0 hooks, through it. A roomy loop also makes it simple to rerig during a hot bite.
From this point on the leader system can get a bit complex, but there are several ways to simplify it. I recommend you either tie or buy at least a dozen big-game leaders that have a minimum of 15 inches of class tippet of 20-pound-test or whatever line class you prefer. Almost all heavy-duty leaders have a shock-absorbing knot like a Bimini twist on both ends of the class tippet. This knot requires practice to tie well, but it’s extremely useful. If you prefer, you can buy pretied leaders in many tippet sizes that include the shock tippet and also meet IGFA standards. Using these gets expensive, however, and if you run out of them on the water you’re stuck.
If you intend to tie your own leaders, you need to use strong knots, especially for the one that connects the class tippet to the shock tippet. The problem with this particular link is that the lines often have very different diameters and breaking strengths, for example 20-pound- to 100-pound-test. Assuming you’ve tied Bimini twists in both ends of your class tippet section, you will have a line with loops at either end (I prefer these loops be at least 2 feet long). I suggest you make the connection with one of three knots each 100 percent in strength – the Albright, the Huffnagel or the Stu Apte Improved Blood Knot (see illustration). On the other end of the class tippet section I simply tie a double surgeon’s knot in the loop formed earlier.
Finally, the last tricky part of this setup is tying the bulky shock tippet to the fly. It’s difficult only because of the thickness of the monofilament. I use a three-turn clinch knot when attaching 100-pound bite tippet to the eye of the hook. Just remember that the maximum length of shock tippet according to the IGFA is 12 inches, including the knots. To ensure it meets those standards, I measure out 101¼2 inches of the shock material and then tie the knot.
Tying a SPEED Nail Knot
First, form an overhand loop in the end of the monofilament material used for the butt-section of your leader. Next, place a toothpick or a nail in line with the fly line to support it, and place the loop next to the end of your fly line and then hold the loop and the line together with your left hand (if you’re right handed). With your right hand wind the right side of the loop over the top of the fly line and the leader material and continue winding away from the end of the fly line approximately seven turns. Hold the wraps between the thumb and first finger of your left hand while you slowly pull the end of the leader with your right hand until the leader is in a straight line off to the right. Tighten and trim.
To turn this into an improved nail knot, strip the coating off about 3 inches of your fly line. Then tie a nail knot as described above over the fly line at the point you stripped the coating off, leaving the core material hanging freely. Carefully pull both ends of the nail knot, but do not tighten completely until you slide the knot down to the very end of your fly line. Then, tie an overhand knot in the core around the monofilament so that it seats itself right where it comes out of the fly line. Snug all the knots and cut off all the loose ends, and apply two or three coats of Knot-Sense to protect the connection. I’ve never had a failure, and I’ve used it on hundreds of 100-plus-pound fish.
**Tying Bite Tippet to Fly
**I prefer to use a simple three-turn clinch knot, but with heavier material you need to do several things. After measuring the right amount of line, I bring the tag end around three times and go back through the loop, then moisten the knot. This next step is extremely important: Fold a piece of paper towel approximately three times and then wrap it around the first finger of your right hand. Take as many turns of the 100-pound mono around your finger as you can, and put the first hook (if you’re using a tandem rig) into a U-bolt or cleat. Hold the tag end perpendicular to the standing end as you start seating the knot. After the knot seats itself a bit, pull evenly with both hands until it’s jammed tight. Holding the tag end to the side prevents the leader from kinking near the knot. If you can’t make the knot seat firmly, use a dab of superglue to secure.