connection_4
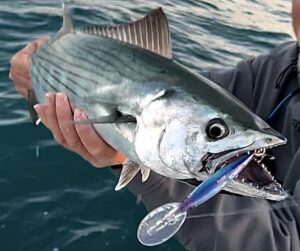
During the 30-plus years I spent fishing Southern California and Baja, wire made up an integral part of my terminal tackle system. Offshore, blue and mako sharks made for exciting fly-rod action, and inshore the barracuda bite often saved the day. Wire bite tippets were essential for both. Today I do most of my local fishing in the coastal waters of the Northeast, and I find myself tying more wire leaders than ever before, thanks primarily to bluefish.
Despite the proven necessity of wire for these and many other species, a large number of fly-fishers shy away from using it because they don’t know how to make the right connections between class tippet and fly. Hopefully we can remedy this.
Pick the Right Wire
Since you have several options, you must first consider the type of wire to use. I have used them all, but I always come back to single-strand. For fly-fishing purposes, I have yet to find a need for multistrand wire because for any given break strength, it has a larger diameter than single-strand, and the accompanying metal crimps are unnecessarily bulky. While today’s anglers can purchase smaller-diameter, coated multistrand wire that they can actually tie knots in, some of it tends to curl easily. And if the coating wears off, this wire can break prematurely.
Single-strand wire is less prone to these problems, providing you select a size with a sufficiently large diameter. Brands vary, but generally you can expect a wire size of 0.018 inch diameter (#7) to yield a breaking strength of approximately 69-pound test. This size works best for practically all my fly-fishing needs. It presents a fairly slim profile and proves easy to work with. If curls begin to form after catching a few fish, most can be straightened by hand.
Bite Tippet to Fly
As with any bite leader, you must contend with two connections. The first involves tying the wire to the fly, and there are several ways to do this. To facilitate quick fly changes, some anglers like to connect the terminal end of the wire to a snap. Personally, I do not like the extra hardware and the bulky profile characteristic of snaps. The haywire twist, a standby among conventional anglers, offers a neat and simple but slightly more permanent alternative.
Unless you have strong, practiced fingers, you’ll need a pair of long-nose pliers to properly fashion a haywire twist. Start the process with about 10 inches of wire to form a bite tippet of about 5 inches; anything longer will be difficult to turn over on the forward cast. Run approximately 6 inches of wire through the fly’s hook eye, and cross the wire over itself. The key to this connection is forming 3 1/2 X’s in the wire. The easiest and most effective way to achieve this is to crisscross the wire to form the first X and then hold this juncture between the pliers’ jaws. With the crisscrossed wire held securely in place, spread the wire legs outward so they flare in a wide V configuration. While holding the pliers in one hand, twist the two legs to form three more complete X’s. If you merely spiral one leg of the wire around the other, the wire could unravel under pressure.
When the third X is formed, reposition the pliers so the jaws are close to this last juncture. Take the tag end of the wire and spiral it around the standing part, forming a series of four barrel wraps. To remove the remaining tag end flush to the last barrel wrap, you must break off this small piece of wire. If you simply nip it off with cutters, a sharp burr will form, which can easily slice your hand when you grab the leader. Grasp the wire with the pliers at the juncture of the last barrel wrap. If necessary, bend the tag end to form a right angle to the barrel wraps. Now bend the tag end upward, and twist slightly backward in a clockwise direction. The wire should break off cleanly with only one or two rotations.
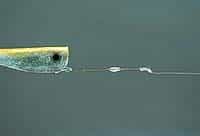
Wire to Mono
The second connection, from wire bite tippet to mono class tippet, is the one that many fly-fishers find troublesome. Instead of tying the wire directly to the mono, many anglers use a small barrel swivel between the two materials. I have tied most of my wahoo leaders this way and have never experienced any failures. However, the swivel adds one piece of hardware, and this is not quite as streamlined as tying the tippet directly to the wire. Tying mono to wire correctly also will yield close to 100 percent of the class tippet’s rated break strength.
To connect the wire leader to the class tippet, form a narrow bend approximately 1 1/2 inches long in the free end of the wire. This loop will form the basis for tying an Albright knot with the mono class tippet. With the loop held flat between your thumb and forefinger, pass the tag end of the mono into the wire loop from behind. Grasp the mono and the wire between these two fingers, and make about eight barrel wraps around the wire loop. Then pass the mono tag end out through the loop, making sure it exits the loop the same way it entered (under the wire loop).
Then tighten the knot in stages. First, gently pull on the standing part of the mono to slide the barrel wraps together. This will also cause the wraps to slide toward the closed end of the wire loop. You want to be careful not to slide the wraps over the end of the wire loop. Pull on the tag end of the mono to snug everything tight. Finish the knot by taking three or four turns around the standing part of the mono with the tag end the same way you finish off a Bimini loop.
If you want a quick-change system, you can Albright the wire to a section of heavier mono like 30- or 40-pound test. Tie a surgeon’s loop in the tag end of the mono so you can interlock it to the leader via a loop-to-loop connection. The wire itself can be reused many times. Just remove the old mono Albright connection, cutting it free of the wire with clippers or burning it off with a match, and tie on a new mono leader.
Regardless of whether you are using a class tippet or a heavy section of mono, the only remaining task is to secure the tag end of the wire loop. Because it was previously cut to length, it will have a sharp burr. It’s not practical to try to break it off flush to the mono wraps. Instead, I’ve found it best to cover it. You can do this with fly-tying thread and a bobbin, but the thread often breaks as it is wound over the metal burr. A better way is to use a piece of 30-pound mono to tie a speed nail knot over the remaining wire tag end, completely encasing it in the mono wraps. Now you can grab the leader and never have to worry about getting cut with the sharp end of the wire.