loop_4
Connecting backing to fly line and fly line to leader should be a simple enough affair. Yet these necessary connections cause many anglers more trouble than they should. While new techniques come and go, I’ve found a system of interlocking loops to be the most practical and efficient way to connect backing, fly lines and leaders that differ in diameter and breaking strength. There are several ways to accomplish this.
When using a shooting head and a monofilament running line, fastening a loop in the mono line is easily accomplished by tying a three-turn surgeon’s knot in both ends of the running line. Now you can connect one end of the running line to the backing and the other to the shooting head. However, you still need a loop in the shooting head.
In fact, I fasten loops in each end of all my fly lines, whether they are shooting heads or continuous-length weight-forward lines. These loops allow quick line and leader changes without having to cut anything. All you do is unlock the interconnecting loops. I also use a loop in the front end of the fly line or shooting head that also makes it easier to change leaders when necessary. Contrary to some misconceptions, a loop in the front end of the fly line will not spook fish and does not adversely affect the way the line turns over on the cast.
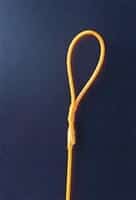
To form a foolproof end loop in a fly line, use the speed nail knot (see Tackle & Technique, July/August 2001). Fold the fly line over itself to form the desired size loop, take a 12-inch length of 8- to 12-pound-test monofilament and bind the two sections of fly line together by tying a seven- to eight-turn nail knot. Pull on both tag ends of the mono to firmly seat the knot. When the knot is really tight, the mono will dig slightly into the fly line’s coating. Tie a second nail knot approximately 1/16 to 1/8 inch behind the first to make a loop that is as strong as the fly line itself. I’ve never had a loop pull free in 30 years of using this procedure. But for a superslick connection, tie a long, 20-turn nail knot that will completely encase the remaining tag end of the fly line. To provide some protection, you can coat the knots with a flexible adhesive like Pliobond or Loon Products’ Knot Sense. I know many anglers who fasten a loop by whip-finishing the fly line together with fly-tying thread and a bobbin. This will work, but it’s not nearly as strong as the nail knot connection.
With some larger-diameter fly lines, like the heavier floating lines, simply folding the line over itself creates a rather bulky connection. To reduce this bulk, strip away about 2 inches of the coating, exposing the inner core. The easiest way to do this is to soak the end of the fly line in acetone for about 20 seconds. This softens the coating, which you can then strip off with your fingernail. Another way to strip off some coating is to tie a piece of 20-pound Dacron around the end of the fly line with a girth hitch. Cinch the hitch up tightly and snap the Dacron toward the tag end of the line. Do not try to remove large sections at a time because the Dacron will bind into the coating; just strip off 1/4-inch segments. Now form the desired size loop in the fly line and bind the exposed core to the coated portion of the fly line with nail knots.
If you want to avoid stripping off portions of the coating, use hollow-core Dacron to form the loop section – commonly referred to as an ”eye splice.” You’ll need a splicing tool, and one of the best for the job is one that you can make yourself. Take a 12-inch length of 27-pound-test single-strand wire and bend it in half. Flatten the bend point with pliers to make it easier to insert the wire into the Dacron braid.
You don’t have to strive for a perfect fit, but it is important for the fly line to fit snugly inside the Dacron braid. Dacron is available in different breaking strengths with varying diameters. As a general guideline, 80- to 100-pound-test Dacron will accommodate fly lines ranging from 8- to 12-weights. Be advised, though, that in any given weight class, floating fly lines have larger diameters than their sinking counterparts.
Work with a 12-inch section of Dacron. Insert the folded end of the wire loop into the braid approximately 6 inches from the tag end. Push the wire up into the braid for a distance of about 11/2 inches. At this juncture push the wire out through the braid. Catch the tag end of the braid inside the wire loop and pull this tag end down through the same 11/2-inch section of braid penetrated by the wire. Pull the wire tool and the tag end out through the braid. Gently pull on the tag end to form the desired loop size (I like mine 1/2 to 3/4 inch long). Some anglers I know insert the tag end into the braid a second time for extra security, but I haven’t found this to be necessary. As long as the loop pulls from dead center (and this is what happens with interlocking loops), the tag end will not pull out from the braid.
Once the loop is formed, work the fly line into the remaining section of Dacron braid below the junction of the loop. You should have about 5 inches of hollow Dacron line remaining after forming the loop. To facilitate the insertion process, cut the end of the fly line on a bias and ”snake” it into the center of the braid. Work the fly line all the way up the braid until you reach the point where the tag end was pulled out. You will know when you’ve reached this point because the fly line will butt up against the exit spot, preventing you from pushing it in any farther. Once the fly line is encased in the braid, whip-finish or nail-knot the frayed ends of the Dacron where the fly line was initially inserted. And if you’re concerned about the splice not holding, you can bind the line securely in the braid by tying a speed nail knot over the section of Dacron below the juncture of the loop.


