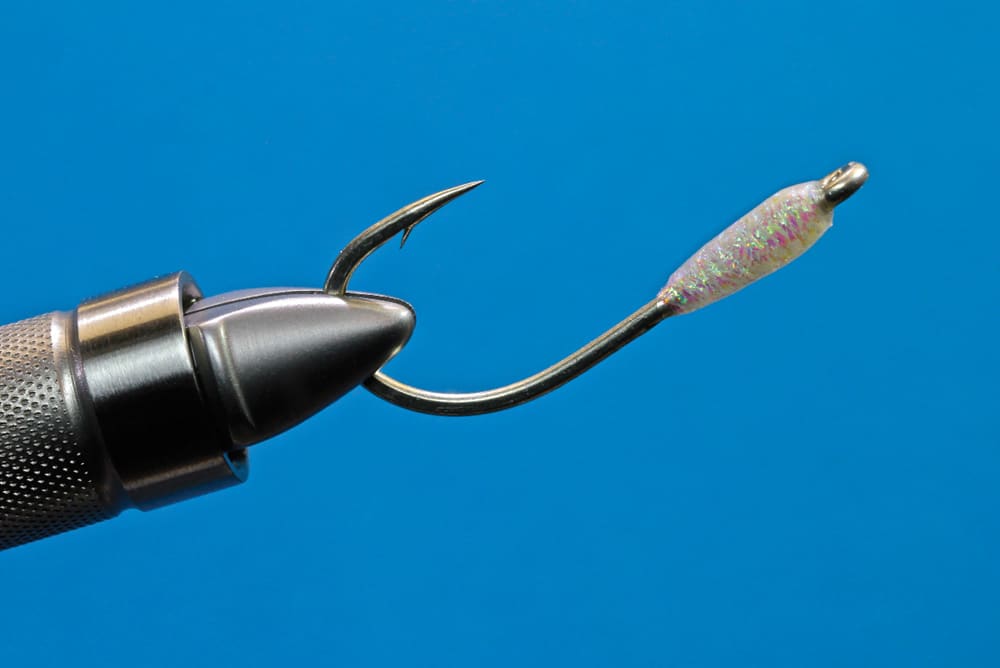
Wide Body Baitfish Fly Hookup
First light, cool still air, knee-deep tidal water moving across sandy flats and striped bass actively finning and feeding — that’s my description of what I consider to be the absolute perfect fishing scenario. My next best situation would include the challenges presented by the not-so-sandy-bottom tidal rivers and estuaries where oyster beds and eelgrass replace the sand.
This second scenario creates a problem for many wide-body baitfish patterns that ride hook down. Flies that swim this way have a tendency to snag on the obstructions on the bottom. To remedy this problem, I began experimenting with baitfish imitations that swim hook point up. What I came up with is a technique that’s made possible by acrylic adhesive. Regarding feathers, fur and flash, one might argue that there are only so many ways to dress up a hook. Personally, I enjoy the challenge and freedom of tying without an agenda. Fuzzy notions bouncing around in my head that eventually find their way to my vise are where it all starts. Over time, these early ideas continue to evolve with subtle tweaks that will better emulate the motions of life and become more eye-catching to the eyes of hungry predators. My flies are always a work in progress.
** Nature’s Perfect Material**
While today’s incredible and ever- growing availability of synthetic materials is spawning new and effective fly patterns all the time, we should never forget about the magnificent engineering and striking potential of nature’s handiwork, the feather. Pure, simple and brilliant. What I’m sharing in this exercise is the application of natural material with some sparse flash for subtle seasoning. I have arrived at this particular pattern design to better contend with snagging shell beds, grass, weeds, branches and debris found on or near the bottom while slowly retrieving my Welded Wide Body Hook Up Baitfish. Change the colors and size to suit your own situation — the only rule is there are no rules with this method; just be creative.
** Tying Without Thread**
Tying with conventional thread started this process, but the ongoing evolution has brought me to a relatively new and exciting fork in the road that might actually annoy some purists. To me, there is certainly a point where a fly is no longer a fly, but I don’t feel that not using thread to secure my materials to the hook is “illegal.” I’ll let you be the judge of that. I didn’t opt to not use thread to attach feathers on this pattern for the sake of doing something different; it actually has an important function that I’m sure any of you who tie with feathers have faced.
When tying feathers onto hooks with thread, one of the biggest headaches is having them roll out of alignment when thread tension is applied. To better control this rolling tendency, I have incorporated acrylic adhesive to “weld” the material in place. It takes a steady hand and a little practice, but the results can be quite pleasing and, more importantly, effective.
Bug-Bond Original with the applicator tip is my tool of choice. This cure is quick and easy because the small tip allows for pinpoint accuracy. After everything is in place, I do apply a thin, clear-coat polish to the head and allow the finished fly to sit in the sun to ensure full potential without leaving a tacky residue. While I use Bug-Bond, there are plenty of other acrylics on the market that should work just as well. If you haven’t used any of the available acrylics, you really should give them a go. I have experimented with this method and have started calling the technique “fly welding.” The particular baitfish imitation you see here is one of many patterns that can be created in this manner. The possibilities are endless.
** Intended Species**: Striped bass
** Pros:** Provides a great generic wide-body profile
** Cons:** Getting used to attaching feathers without thread
** Creator:** Peter Gray
** MATERIALS**
HOOK: Mustad Signature Big Game Light
THREAD: Mono thread
EYES: 3-D prismatic eyes sized appropriately
BODY: Bill’s Bodi-Braid FLASH: Pearl Flashabou
WING: Neck or saddle hackle
ADHESIVE: Light cured acrylic