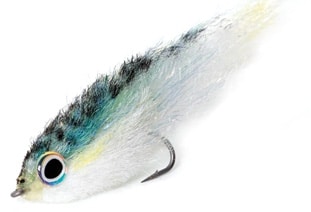
The Pacific mackerel (Scomber japonicus) is a predominant pelagic baitfish that migrates inshore and offshore along the Pacific coast from northern British Columbia to Mexico. Easily identifiable by its iridescent body, this mackerel is tubular in shape and marked with wavy, irregular dark bands on top.
In the Pacific, large schools follow a northerly migration in early summer and then move south in late fall. They spawn in the early spring months off California, where they fall prey to many local inshore species, such as white seabass, stripers, Pacific barracuda, yellowtail and calico bass.
3-D Versatility
As a kid growing up and fishing on the east coast, I was intimately familiar with the early springtime mackerel migration and respected the fish’s importance as a popular baitfish for stripers, bluefish and tuna. Pacific mackerel are no different.
During my 20 years in Southern California, this bait has always seemed abundant and plentiful. So whether inshore or offshore, I’ve made it a point to keep a permanent stash of Minty Macs in my fly box. I’ve had some banner days using this pattern too – both in the standard Deceiver style and tied Clouser-style, weighted and with a deep belly.
The Minty Mac is not difficult to tie, and when constructed with some of today’s newer synthetics, it can look quite realistic. All it requires is some mad barber skills to make it appear streamlined and edible.
Minty Macs are constructed in the 3-D style, a method of tying popularized in the early 1990s by Bob Popovics, in which a fly is sculpted by layering materials on top of each other in varying lengths. Typically you begin with longer sections of material off the hook bend and follow with shorter sections while moving toward the eye.
By choosing how much material to use and where to tie it in along the shank, you can determine the overall shape after the fly is trimmed. This means you can make baits wide and thin or long and round. It is completely up to you.
Blending and Trimming
Mackerel are generally long and conical, so we want our materials to be tied 360 degrees around a longer shank hook, such as Mustad’s new 34011, which is an excellent choice for this pattern. To match the Pacific mackerel’s greenish-blue top coloration, I use Steve Farrar’s SF Blend in natural, which is a minty light-green synthetic. I also weave in some Angel Hair flash. For the bluish tint, I rely on Flash N Slinky in aquamarine. Tying these materials in sequence produces a shiny vibrancy, effectively mimicking the iridescent, bluish-green top coloration of a mackerel.
On their undersides, Pacific mackerel are silvery-white, and I incorporate a white SF Blend and then finish with white EP Fiber in the front portion. The EP Fiber, tied in short lengths, is denser and can be trimmed with finer detail around the fly’s head.
I use Hareline Dubbin’s new 3-D oval eyes on this pattern. They’re available in four color combinations, and I’ve found the pearl/black perfectly matches a mackerel’s eye.
Of course, the last (and most important) part of tying this fly is the trimming process. After positioning all your materials, you’ll likely end up with a wild, bohemian-looking abomination that would make Don King proud!
Don’t worry: That’s how it’s supposed to look. First, comb out all the untrimmed synthetic fibers so they point toward the back of the fly. The easiest way to begin trimming is to work from the back to the front. Be sure to take it slow, removing small amounts of material at a time and always reassessing the profile.
Before you know it, a teardrop baitfish will magically appear before your eyes! Toss it wherever gamefish commonly feed on mackerel.
**Materials **
Hook: Mustad streamer S74SZ-34011, 2/0
Thread: Clear monofilament
Wing: SF Blend, natural, and Flash N Slinky, aquamarine
Underbelly: SF Blend and EP Fiber, white
Tail: Ultra Hair, white
Eyes: Hareline Dubbin 516 oval 3-D, pearl/black
Markings: Sharpie, yellow and green, and Uni-Paint broad-line marker, black
Finish: Tuffleye Flex (tail) and Tuffleye Finish (head)
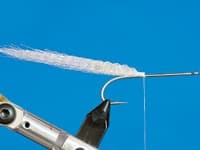
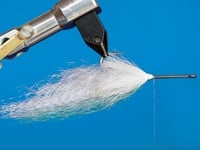
| Step 1: Atop hook bend, tie in a long section of white Ultra Hair, which will determine length and keep the fly from fouling. Apply Tuffleye Flex about a quarter-inch past the hook bend. |
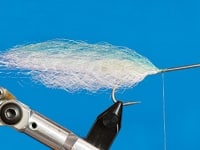
| | Step 2: Invert fly and tie in two shorter pieces of white SF Blend on each side to fill in underbelly.|

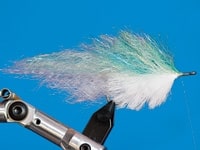
| | Step 3: Flip fly back over and tie in a longer section of natural SF Blend, then top with aquamarine Flash N Slinky, stretching just short of the tail section. |
| | Step 4: Tie in the last two shorter pieces of white SF Blend, one on each side, to fill in rear underbelly. |
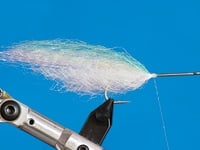
| | Step 5: Invert fly and add three short sections of white EP Fiber, one on each side and one below. The fiber should extend just behind the hook bend. |
| | Step 6: Flip fly back over and add another section of natural SF Blend, along with more aquamarine Flash N Slinky, reverse-style. Invert fly again and add shorter sections of EP Fiber below, working forward. Continue this process until reaching the hook eye.|
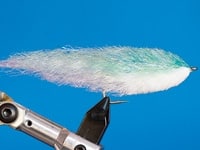
| | Step 7: Tie off fly, remove it from vise, comb out fibers and trim, starting from the rear and working forward. Take your time. Remove bits at a time to produce the tapered shape you desire.|
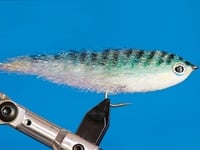
| | Step 8: Add oval 3-D eyes with a dab of goop, pressing them into the EP Fiber to anchor. Let dry and finish head with Tuffleye Finish. Add green stripes with a Sharpie and then carefully stripe the top and sides of the fly with the chiseled edge of a black Uni-Paint marker. I add a little Sharpie yellow in the tail and gill section to finish the Minty Mac.|
|


