I’ll admit it – when it comes to tying flies, I suffer from obsessive-compulsive disorder. No matter how much time I’ve spent tying a fly, I will not transfer it from the vise to the box unless it’s what I consider a masterpiece. Every hair has to be just so, the eyes must be completely symmetrical, every strand of flash has to be the perfect length, and without a doubt, the head or nose (depending on the pattern) has to be flawless.
I realize that if a fly appears as food, a hungry fish will look past what I consider imperfections. However, I rationalize my obsessive-compulsive tendencies: Not only do I take pride in tying nice-looking flies, but I believe that having confidence in the fly will increase my hookup ratio.
There are many things you can do to improve the appearance and functionality of your flies, but I’ll save most for other columns. For this one I’ll focus on how you can create picture-perfect heads and noses.
**Leave Enough Room
**The first thing to consider when it comes to building a head or nose is how much of the shank you need. It’s tempting to tie in materials close to the eye of the hook, since that is where most flies are finished off. If you make a poor call and don’t leave enough room, though, you will end up with materials that extend over the eye. This is problematic because unless the materials are completely wrapped, they have a tendency to slip. Also, a fly in this condition makes it easy for head cement to find its way into the eye when applied. And let’s not forget – it’s unattractive. To avoid this, I first visualize where I want the head or nose of the pattern to start. Once that’s determined, I consciously cheat that distance back toward the bend of the hook approximately one-eighth inch. In all my years of tying, I’ve turned out thousands of flies, and I’m still amazed at how fast the space I leave on the shank gets eaten up by wraps and materials, which is why I always leave myself a little more wiggle room than I think I need.
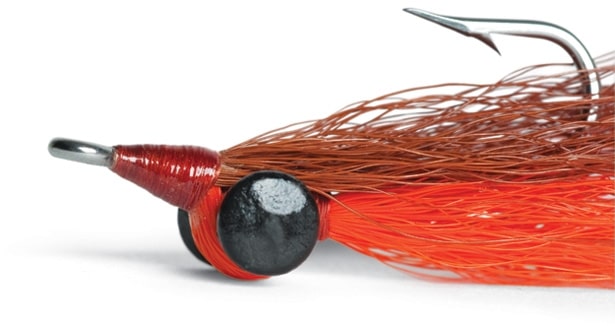
**Don’t Overload
**Using too much material also contributes to ugly heads and noses. There’s a fine line between using just the right amount and using way too much. With most materials, I feel a less is more approach is best. Aside from throwing off the balance of the fly, using excessive amounts of material will almost always leave you with an unsightly head or nose. This is a problem that took me years to correct. I can remember tying Clouser Minnows in which I used so much bucktail they actually floated, despite having lead eyes. A common flaw I noticed in all of those poor excuses for flies was the dreaded staircase. This is the jump from the top of the material tied in down to the shank and is a telltale sign that too much material is in play. It is possible to compensate for this stair-step appearance with thread wraps, but be judicious with your wraps. You have only so many to work with before the head or nose becomes too bulky. Use as many as you need to secure the material to the shank, but not one more. The goal is to save as many wraps as can so you can use the thread to shape the head or nose at the end of the tying process. I find that when I trim my material at a slight angle and then tie it in, I’m able to use fewer wraps, and what might have been a staircase ends up more like a ramp, which is a much easier shape to wrap over neatly.
**Comb It Out
**When you are tying with natural materials, you should always get rid of as much underfur as you can. If it’s left in, your thread won’t compress the material, leaving you with a giant nose or head, and once again, you run the risk of having your materials slip. Many tiers use a doll comb for this, but my preferred method of removing underfur is to use the point of my closed scissors. I take the butt end of the material (the part that I’m going to wrap over) and set it on my leg (not on bare skin) and then comb through the material to extract any unwanted hair. I find doll combs a little too aggressive. When using them, I’ve noticed that they not only remove underfur but sometimes they actually pull hair that I want left in. Using scissors gives you much more control of how much and what type of hair is removed.
**Finish It Up
**The final two steps of finishing for just about any fly involve a whip finish and a coat of head cement, both of which can help the appearance of heads and noses.
Once the desired head or nose shape is established, it’s time to whip-finish. Most styles of whip finishes are nothing more than a series of half hitches. It’s crucial that each half hitch in your whip butts up against the previous one (known as barrel wrapping). This keeps the desired shape and gives a smooth platform for cement application. If you want a showroom finish, I suggest putting several coats of head cement on your fly. If you believe that fish pick up the scent of cement, you can omit this step. Depending on what species the fly is intended for, I will often skip this step myself. The first coat soaks into the thread and is enough to hold all of your wraps and such in place. Once that base coat dries, any successive coat essentially forms a shell that gives a smooth, shiny and attractive finish.
***
**Thread Lightly
**If you try all of the tips mentioned in this column and are still wrestling with bulky or misshaped heads and noses, I’m willing to bet your problem lies in the thread you are using. You might think that thinner thread is better suited for freshwater patterns, but the truth is it is incredibly useful for saltwater flies. The best attribute of thin thread is that it is quite forgiving, allowing you to use a lot more wraps. The obvious con is strength. Even though you can employ only a limited amount of tension, you’re able to use more wraps – a trade-off you will quickly learn to live with. Using more wraps and less tension achieves the same end result, and I’d rather have those extra wraps at my disposal to finesse a nice-looking head or nose. Chances are you will break your thread many times before your wrapping hand develops a feel for how much tension the thinner thread can take. Give it some time, and before long your flies will drastically improve and your heavy-duty threads will be better left for applications such as spinning deer hair.