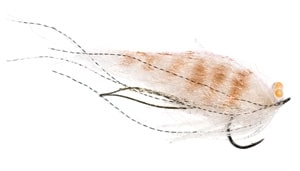
For stripers in the Northeast, bonefish or tarpon in the Keys or redfish in Texas, shrimp are juicy and delicious. The Slinky Shrimp is a versatile design that’s easily modified to match the hatch of your local fishery, and when used in conjunction with the right retrieve and an intermediate line, few game fish can pass it up.
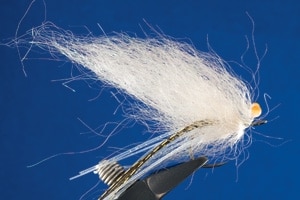
The standard Slinky Shrimp mimics the white shrimp, which is especially common in Florida’s coastal waters. It’s lightweight, making it easy to cast, and on its descent it moves in such a way that it really looks real. This pattern has quickly become my go-to fly whenever I’m fishing a shrimp area.
The pattern can be weighted easily for deeper water and a faster sink rate by adding dumbbell eyes after attaching the rear legs (see Step 1). Adding weight helps get the fly down more quickly and holds it on the bottom in strong current.
For grass flats or oyster beds, I like to tie this fly using a bendback hook. This modification helps keep the hook point from snagging the bottom, and because material covers the point, you can slip it in and out of grass beds without hang-ups. This is the preferred method for areas where fish feed consistently in ultra shallow water, like Mosquito Lagoon.
This fly also excels in deeper channels and inlets that have a good amount of current. Snook, tarpon, jack crevalle, redfish and a host of other species often hold in the current, picking off shrimp as they drift out on the tide. This is a perfect application for the Slinky Shrimp.
From an anchored boat, using an intermediate or sinking line – depending on the speed of the current – make a quartering cast up-current. As the fly sweeps, give it a few small bumps, but generally let it swing until just before it drags behind the boat, and then recast. When you hear fish popping shrimp as they fall out on the tide, it’s a simple matter to use the same procedure, only casting toward the splooshes.
Most people work shrimp flies way too quickly. Think about how a shrimp moves and strip accordingly. In other words, bring your fly to life by using your mind’s eye to envision the way shrimp really move. Slink and slither the fly in and around the grasses. Don’t be afraid to give your shrimp an occasional sharp pull now and again. Shrimp are nervous creatures and thrust their tails if they sense danger. This movement not only catches the eye of nearby predators; it will often induce a strike if you let the Slinky Shrimp fall back toward the bottom. Predatory fish know that if they let a shrimp get back to the bottom, they may not get a chance to eat it. You’ll be able to trigger that fatal flaw shared by fish and humans: the tendency to eat one too many.
**Materials
**
HOOK: Owner Mosquito 5377-121 2/0 or Tiemco 600SP #2.
THREAD: Monofilament .004.
EYES: Puglisi Crab/Shrimp Eyes, large natural.
BODY: Steve Farrar Blend (Slinky Fiber/Angel Hair) Shrimp.
LEGS: Sili Legs clear/pearl/silver flake and gold/black.
ANTENNAE: Black Krystal Flash.
FLASH: Krystal Flash pink.
ADHESIVE: Head cement or Sally Hansen’s Hard as Nails.
BARRING: Pantone marker, brown.
Tying Instructions
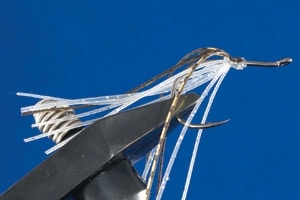
| Step 1: Tie eight clear/pearl Sili Legs directly opposite the hook point, on the underside of the shank. Next, tie in four gold/black Sili Legs on the top of the shank. Cut legs to length. Trim the tag ends and make several wraps just in front of the legs; secure this with a drop of head cement. |
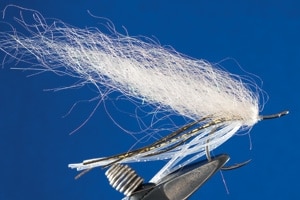
| | Step 2: Cut a bundle of the SFB about the diameter of your vise post. Work the cut end back and forth between your index finger and thumb until both sides are tapered equally. Attach the middle of your bundle onto the shank just in front of the legs, making sure the fibers are equally distributed around the shank. Pull the forward-facing fibers back and blend them in with the standing fibers. Use a pair of taperizing scissors if necessary to blend the two halves together as one. |
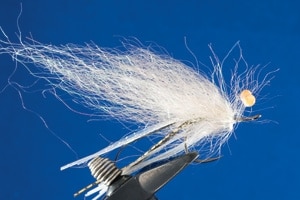
| | Step 3: Add the eyes at a 45-degree angle and make 25 to 30 tight wraps. The eyeball itself should extend past the eye of the hook. Pull the eyes back and make 10 to 20 wraps just in front of the posts to help hold them in an upright position. Cut the tags. To conceal where you’ve tied-in the eyes and to create additional swimming legs, cut a small clump of SFB and attach it on top of the eye posts on the underside of the shank. Using the same technique of tying the material in the middle and folding it back onto itself, make sure the fibers get distributed evenly to cover any thread wraps. |
| | Step 4: Cut another bundle of SFB, just a little bit smaller than you did in Step 2. Taper it with your thumb and index finger and attach in front of the eyes. Make sure the fibers are evenly distributed around the shank. Fold this back so that it is under and over the eyes. Use your thumbnail to manipulate the fibers into position by pressing down on the thread where you’ve tied it in. |
| | Step 5: Add four pearl Sili Legs to the underside of the shank and trim the ends evenly. Tie in six to eight strands of pink Krystal Flash directly on the top of the fly. Now add two strands of black Krystal Flash to each side of the fly to create the antennae. Whip finish and mark with the pantone pen to make the segments.|
|


