Over the years, I have been spending more and more time in the blue water in search of pelagics to bend a fly rod. While existing patterns have resulted in some success, I was looking for a better mousetrap. I began experimenting with several different designs and materials, and over successive trips, this fly has evolved into its present form.
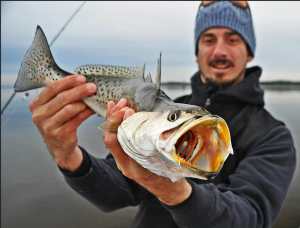
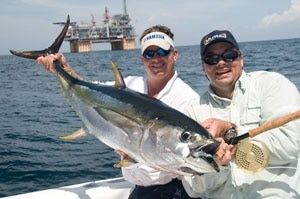
The Dr. Fish’s Flyer has proven itself time and time again as a real go-to fly when chasing tuna (including yellowfin, blackfin, skipjack and bluefin). It has been equally effective on other species such as billfish, wahoo and dolphin.
Setting the hook on a 70-pound yellowfin while the fish is 5 feet in the air never gets old!
*****
Materials
Hook: Signature C71SSS or C70SD, C68SZ, Ultra Point 32807BLN
Thread: Ultra Thread 140 in Purple (092)
Body Material: Silver Polar Flash, Opal/Light Blue Flashabou Mirage Blend
Outer Body Material: Pearl/Silver Wapsi Flexi-Cord Light in Large
Wings: Blue Montana Fly Works ShimmerSkin (can sub large saltwater hackle)
Eyes: 3/8″ Dome Eyes
*******
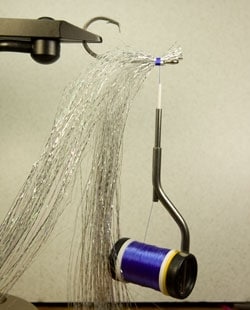
| Step 1: Place the hook in the vise and secure thread to the hook. |
| | Step 2: Tie down the first layer of silver Polar Flash to the top of the hook.|
| | Step 3: Tie down a second layer of silver Polar Flash (each layer should be an equal amount) to the underside of the hook.|
| | Step 4: Tie down a layer on the left and right sides of the hook.|
| | Step 5: Tie down one more layer of Polar Flash to the topside of the hook.|
| | Step 6: Tie down a layer of Flashabou Mirage Blend on the top of the hook, whip finish and then apply a coating of thin head cement, which will wick into the underlying layers and help lock down the materials.|
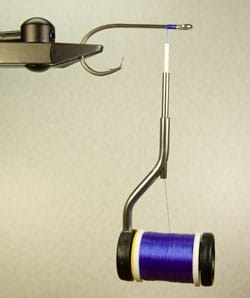
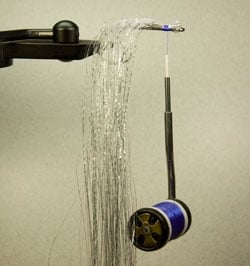
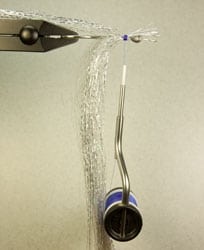
| | Step 7A: Take piece of Pearl/Silver Wapsi Flexi-Cord Light and start passing the fly into the tubing.|
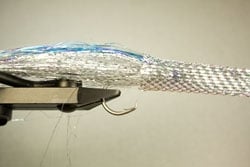
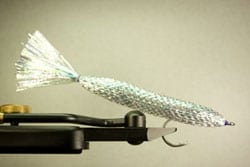
| | Step 7B: Pass the tubing over the fly and hook point, and remove the fly from the vise to allow the fly to be slid completely into the Flexi-Cord Light. The depth in which you slide the fly into the tubing depends on the size of the flyer you are looking to tie. Typically I slide the fly into the tubing until around 2 ½ to 3 inches of the Polar Flash and Mirage Blend are sticking out of the tubing.|
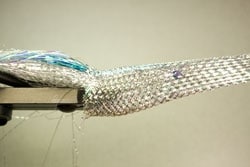
| | Step 7C: Once you figure out how long you want the fly, pass the hook through the bottom of the Flexi-Cord Light so that there is enough tubing to allow for a full profile head.|

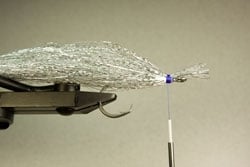
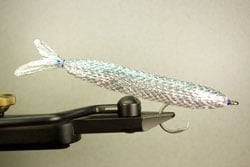
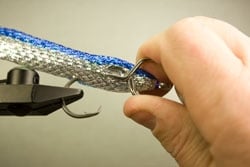
| | Step 8: Secure the Flexi-Cord Light just behind the eye of the hook. In order to do so without putting a fold or crease in the tubing, make 3 loose wraps and then slowly pull tight. Then make several wraps, whip finish and trim the excess tubing. Apply some thin head cement to help secure the materials.|
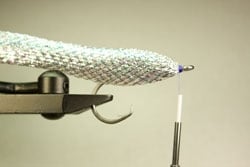
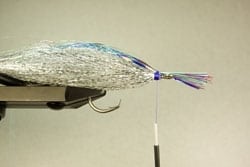
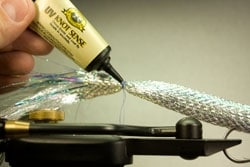
| | Step 9A: With the fly in the vise, figure out where you want the tail to start and pinch that spot with your thumb and forefinger. Be sure the tubing is not pulled too tightly, as you want a nice, full body. Then while securely pinching the tail area, remove the fly from the vise and begin making wraps to form the tail section. |
| | Step 9B: Apply a ring of Loon’s UV Knot Sense (can sub Super Glue or fast trying head cement) around the base of the tail.|
|
Continued on next page>>
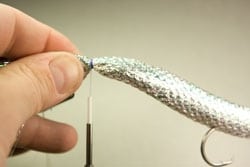
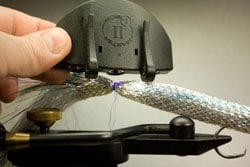
| Step 9C: Cure the Loon UV Knot Sense with the Master Vision II light to secure the thread. You can then let place the fly back in the vise and let go of the fly and trim the thread. I use the Master Vision light, as it cures the Knot Sense much faster than the Loon branded light. |
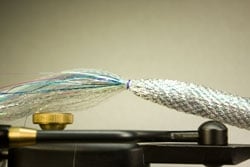
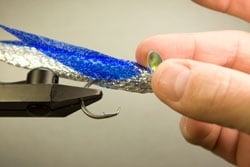
| | Step 9D: Carefully trim the excess tubing from around the base of the tail so that only the Polar Flash and Mirage Blend extend out, forming the tail.|
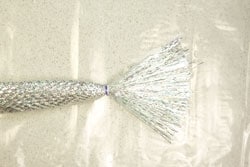
| | Step 10A: If the tail section is too bulky, use thinning shears to reduce that bulk. Then lay the tail section on a plastic bag, spread the tail section out and apply a thin coating of Softex to the tail section, being sure the materials are splayed out fully. |
| | Step 10B: Before fully dry, peel the tail section up from the plastic bag and use your fingers to spread the tail and Softex evenly. Place in the vise and allow to fully dry.|
| | Step 11: Take your scissors and trim the tail into shape. Then coat the tail with Loon clear Hard Head and allow to dry.|
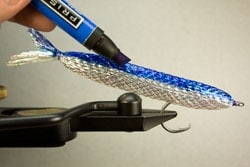
| | Step 12: Take Prismacolor marker (Ultramarine Blue #PM-44) and color the upper 40 percent of the back and body and top of tail.|
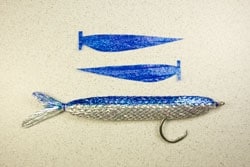
| | Step 13A: Measure up the body of the fly and then cut the fins from the ShimmerSkin. I cut the fins so that they are long enough to get close to the tail section. When trimming the fins to shape, be mindful that the fins are matching in size and have tabs on the front of the fins that will help hold them firmly in the fly.|
| | Step 13B: Once the fins are trimmed properly, use your hackle pliers to part the tubing material. You can then insert the fin tab. Once inserted, be sure to wiggle the fin around so that it is seated properly and sits straight and flush against the body. Repeat this for the fin on the other size.|
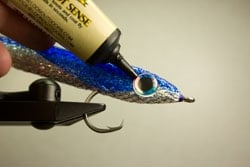
| | Step 14A: Apply the dome eye to the fly so that the adhesive backed eye overlaps the spot in which the fin enters the head of the fly. Once both eyes are applied, squeeze firmly to be sure you get good adhesion.|
| | Step 14B: Frame in each eye with a ring of Loon’s UV Knot Sense, being sure the Knot Sense overlaps the dome eye and the tubing. Once done, sure with the Master Vision Black Light. After fully cured, apply a thin coating over the eyes and head thread wraps with a good quality gloss head cement like Helly Hansen Hard as Nails or Hard as Hull.|
|
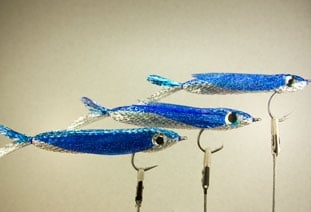
Congratulations, your flying fish fly is complete and ready to toss at a wide variety of saltwater species.