Most important fishing knots
Ryan Swanson
The best tackle, the stoutest line and the deadliest lure are only as good as the weakest knot in your rig. Choosing the right knot for a specific purpose may seem daunting, but when you narrow your options to a few proven, trustworthy knots, you can’t go too far wrong. Learn a few and learn them well and concentrate on fishing.
The following gallery includes eight essential fishing knots and proper tying instructions that will handle just about any line, leader and lure configuration you’ll encounter. Learn these and rest assured you’ll always be well connected. And if you want to expand your knot knowledge, pick up a pocket copy of Joe Mahler’s _Essential Knots and Rigs for Salt Water here.
Albright Knot
Albright Knot
Joe Mahler / www.joemahler.com
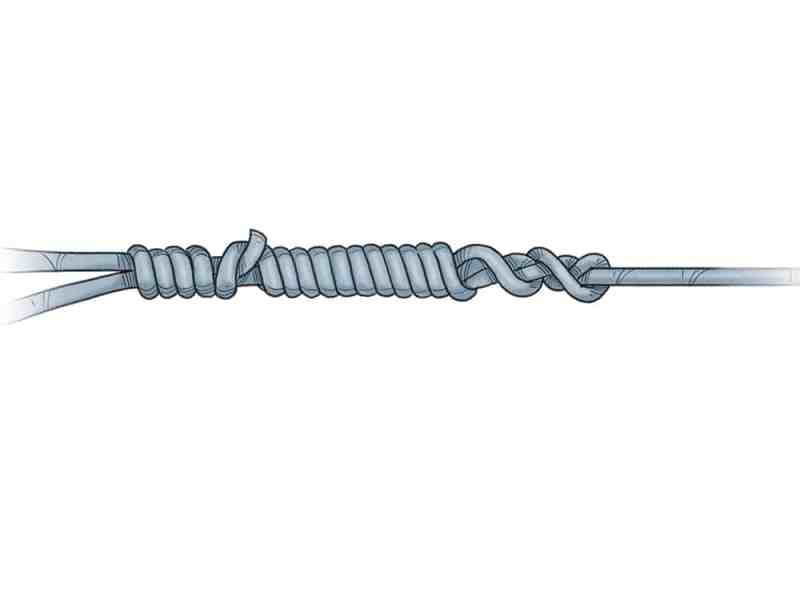
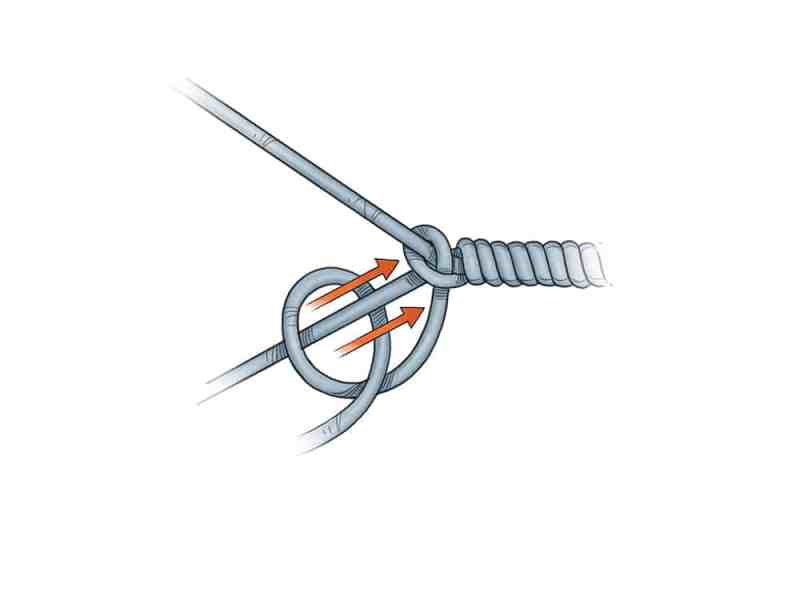
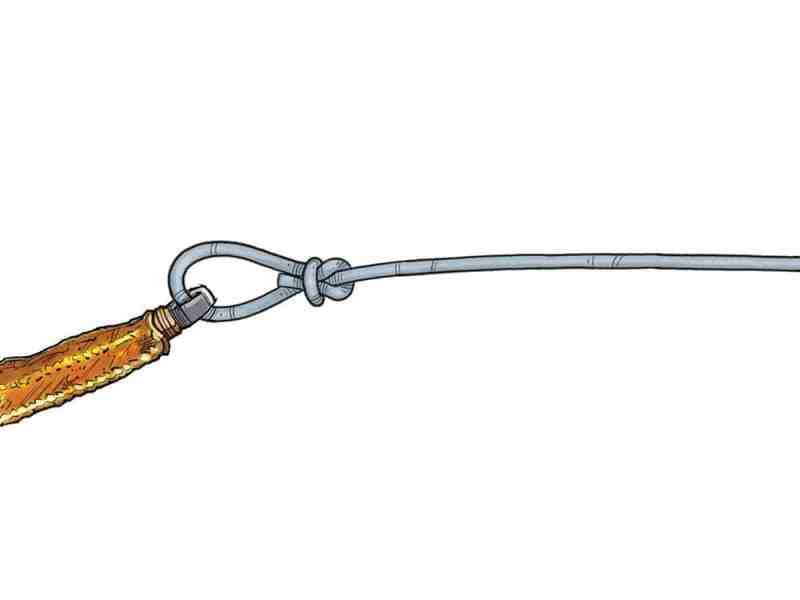
Developed by legendary Keys tarpon guide Jimmy Albright. the Albright knot has a number of uses but it is most commonly used to attach monofilament or fluorocarbon leader to wire leader, or light mono to heavier mono. It is among the sleekest of knots. When tying the Albright with single-strand wire, you may want to use a haywire twist for added security.
Step 1
Form a loop in the wire or heavier line and bend the end of the loop slightly outward with pliers. Feed the tag of the lighter line downward through the loop.
Joe Mahler / www.joemahler.com
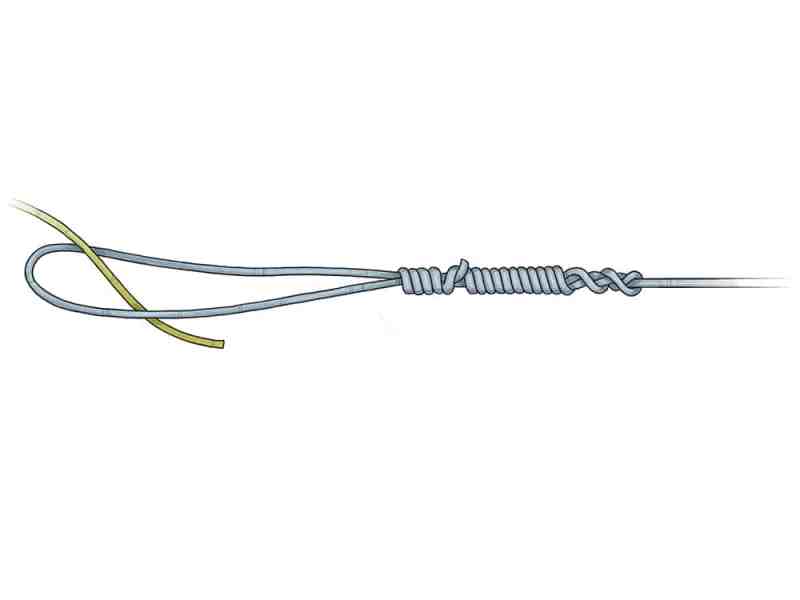
Step 2
Grasp and hold the loop together while bringing the tag back over the loop.
Joe Mahler / www.joemahler.com
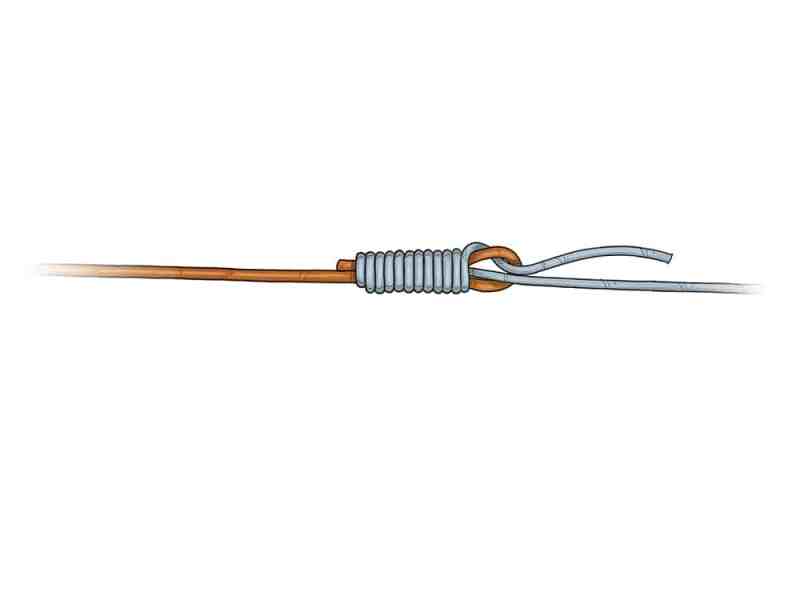
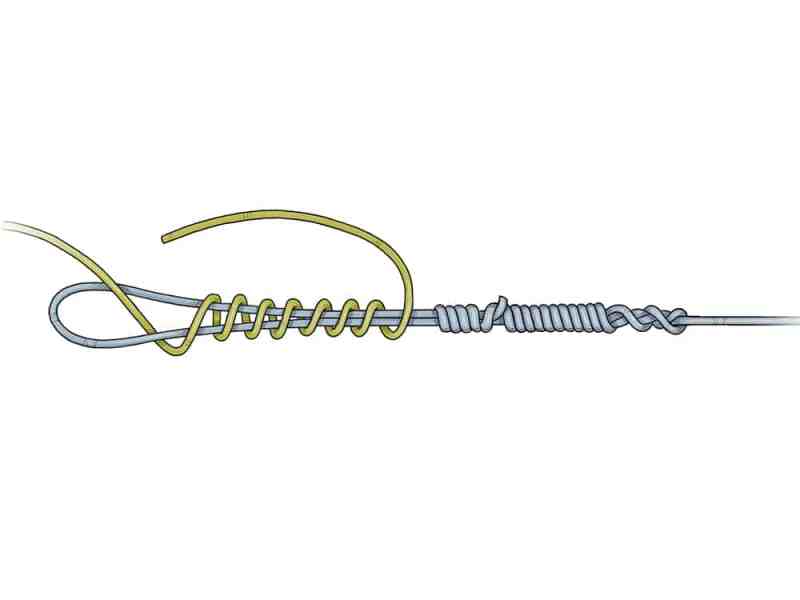
Step 3
Make 10-12 wraps from left to right, wrapping around all three strands and taking care to place the wraps neatly next to each other. Feed the tag out of the loop in the same direction that it entered it in.
Joe Mahler / www.joemahler.com
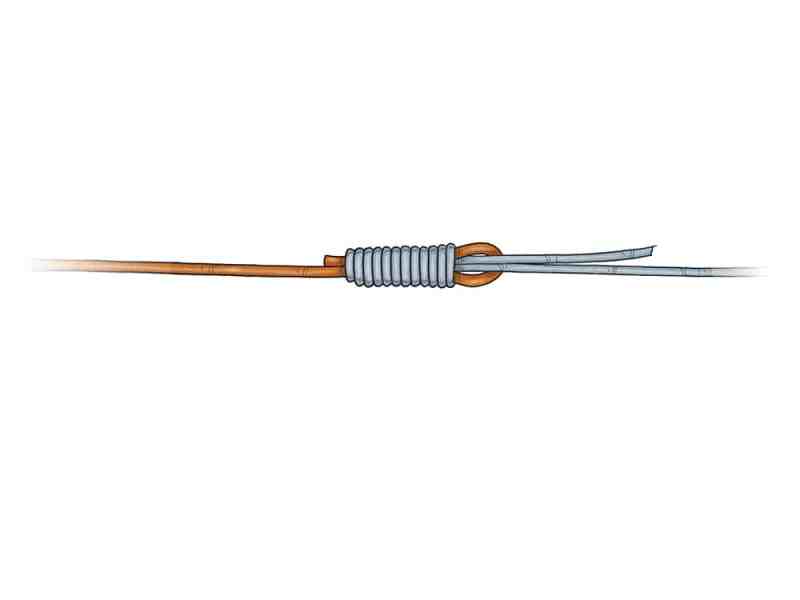
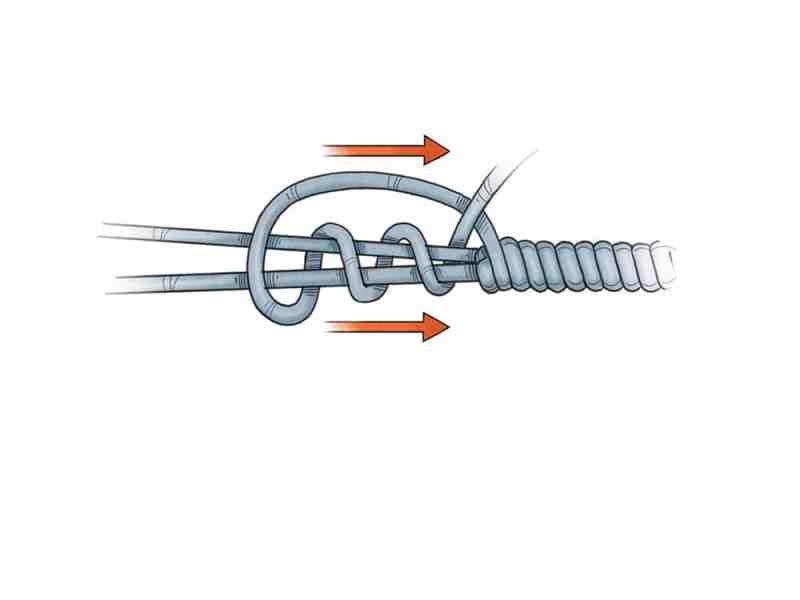
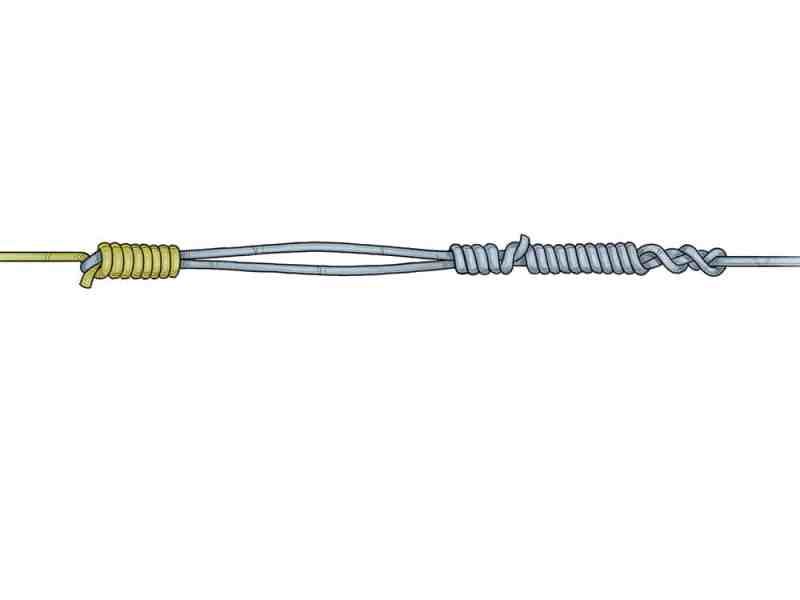
Step 4
Slowly pull on the loop to tighten it while sliding the wraps toward the loop’s end. Tighten the loop by pulling on both the standing line and tag of the thinner line, making sure that the wraps do not go past the end of the loop. After moving the coils to the end, pull the small tag to keep the coils in place. Pull on the small standing part. Now pull the small tag end again.
Joe Mahler / www.joemahler.com
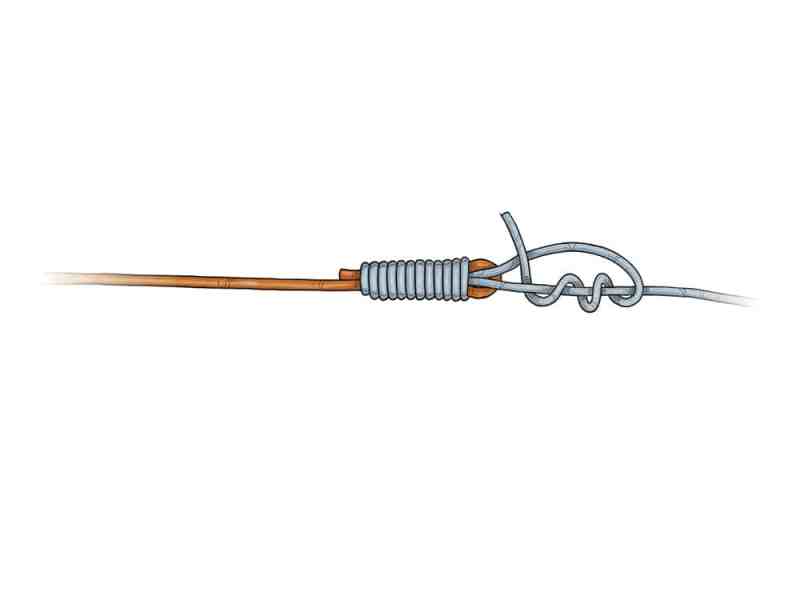
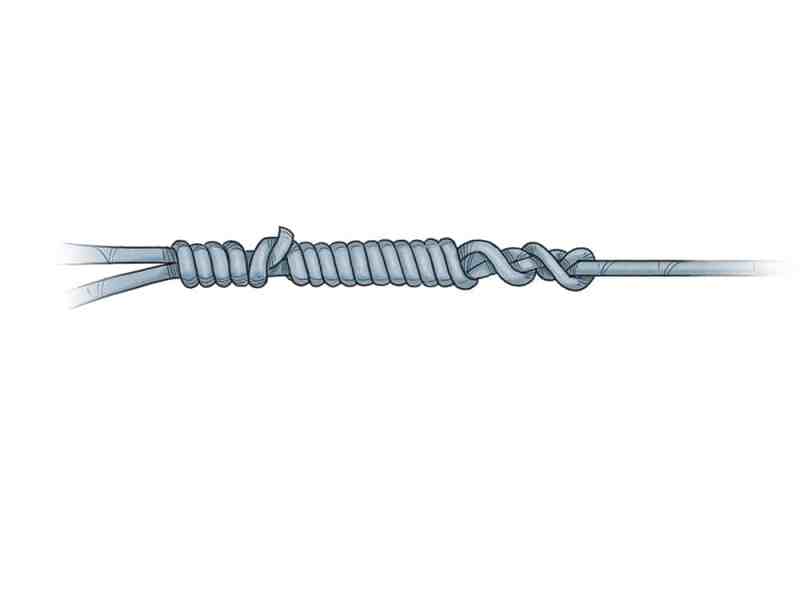
Step 5 (Optional)
To further lock this knot, instead of trimming the tag, form a three-turn half hitch and tighten it up pulling in the direction of the loop. This step is optional, but recommended.
Joe Mahler / www.joemahler.com
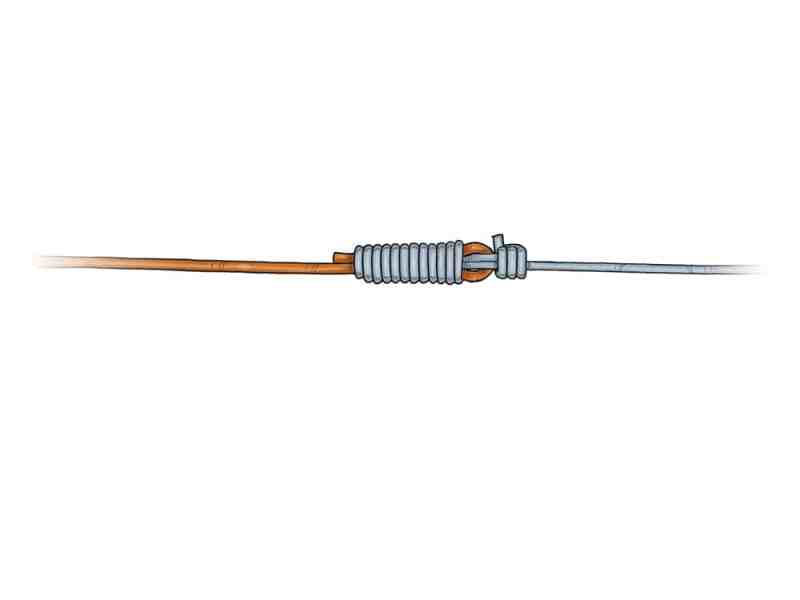
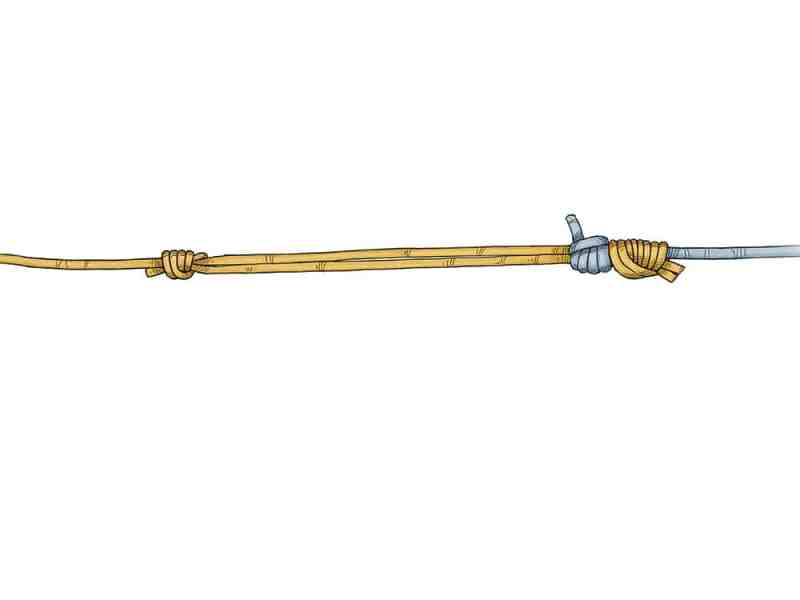
Step 6
Test the knot and trim the tags.
Joe Mahler / www.joemahler.com
Bimini Twist
Bimini Twist
Joe Mahler / www.joemahler.com
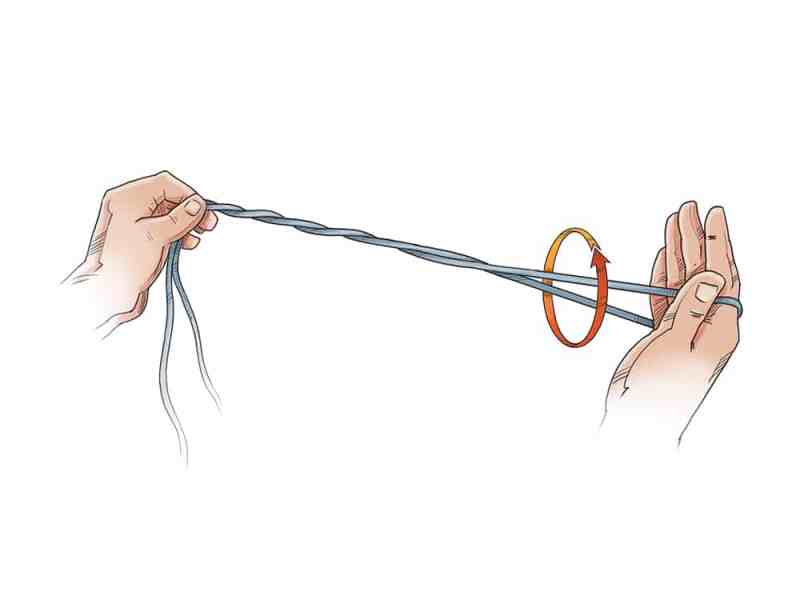
Although generally associated with big game leaders, this is an excellent choice for forming a double line to connect to much larger diameter mono. The Bimini is the only knot that tests stronger than the line itself. The knot also acts as a shock absorber, giving slightly under sudden pressure and lessening the chance of line breaking. A 20-twist Bimini is shown here, but more twists (sometimes up to 60) will add more shock absorption.
Step 1
Start with enough line to make the desired loop–30 inches should work. Next, double the line over, forming a loop. Place your hand in the loop and twist 20 times.
Joe Mahler / www.joemahler.com
Step 2
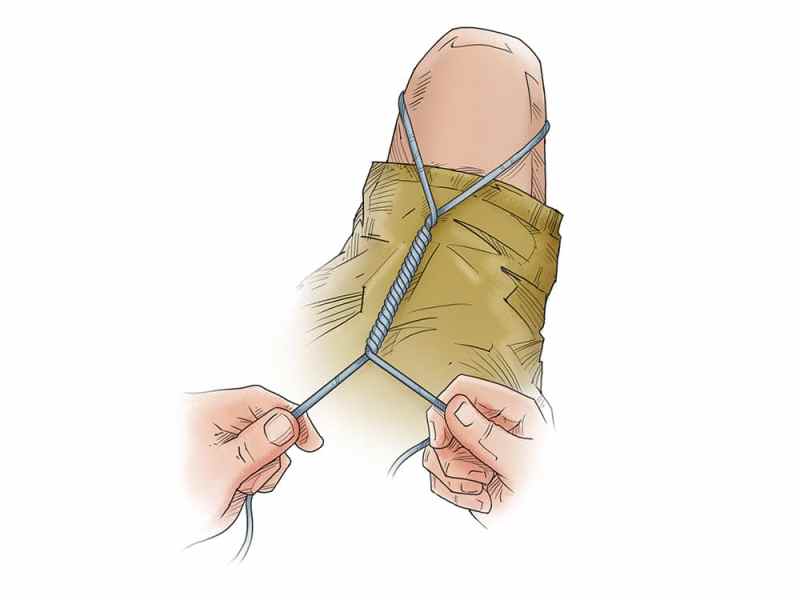
Slide the loop over your knee, foot, or boat cleat. Grasp the standing part in your left hand and the tag in your right. Slowly spread the two strands apart, forcing the twists to compact and move downward to the knee. Keep the two strands very taught.
Joe Mahler / www.joemahler.com
Step 3
Place your right index finger below the intersection of the twists. Move your right hand (and tag) forward until the line begins to wrap over itself toward your knee. Space the first two wraps farther apart, and place the remaining wraps tightly against each other.
Joe Mahler / www.joemahler.com
Step 4
While keeping tension on the standing line, creep your left hand forward and trap the wraps between your thumb and forefinger. With your right hand, make a half hitch around one leg of the loop, and then the other.
Joe Mahler / www.joemahler.com
Step 5
With the tag end, make a 3-turn half hitch around both legs.
Joe Mahler / www.joemahler.com
Step 6
Lubricate and tighten by pulling the tag end opposite the loop.
Joe Mahler / www.joemahler.com
** TIP:** Instead of making a 3-turn half hitch, make six turns. Now, instead of tightening, grasp the loop formed by the half hitches and “unwrap,” placing the newly-formed coils close together, snug against the bottom of the Bimini. Tighten by pulling the tag.
Double Uni Knot
Double Uni Knot
Joe Mahler / www.joemahler.com
The uni knot is marvelous in its flexibility. In this case, we can use a doubled main line and attach it to a heavier-diameter leader. This same doubling technique can be used when tying other knots, such as the blood or surgeon’s.
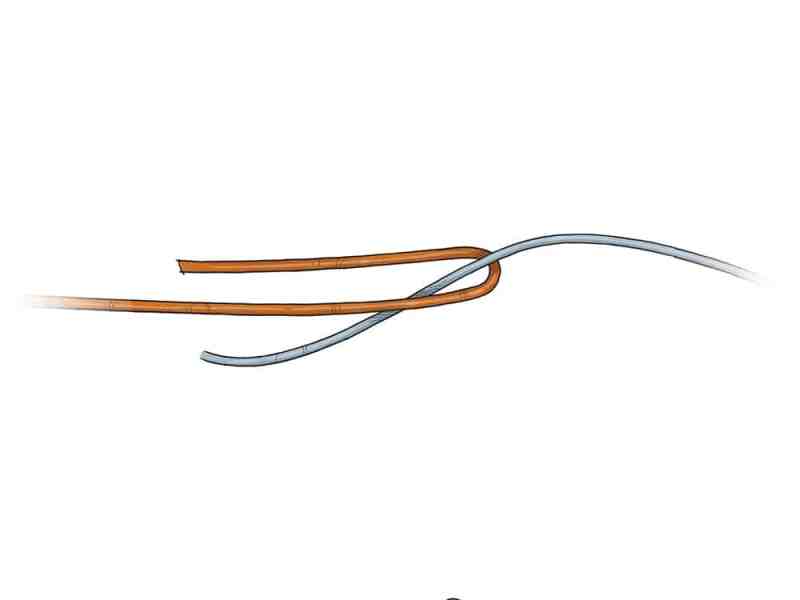
Step 1
Tie a Bimini Twist, Triple Surgeon’s Loop, or spider Hitch into the main line. Place the loop and single leader line together with the working ends opposite each other. Bend the end of the loop around to form a crossing loop.
Joe Mahler / www.joemahler.com
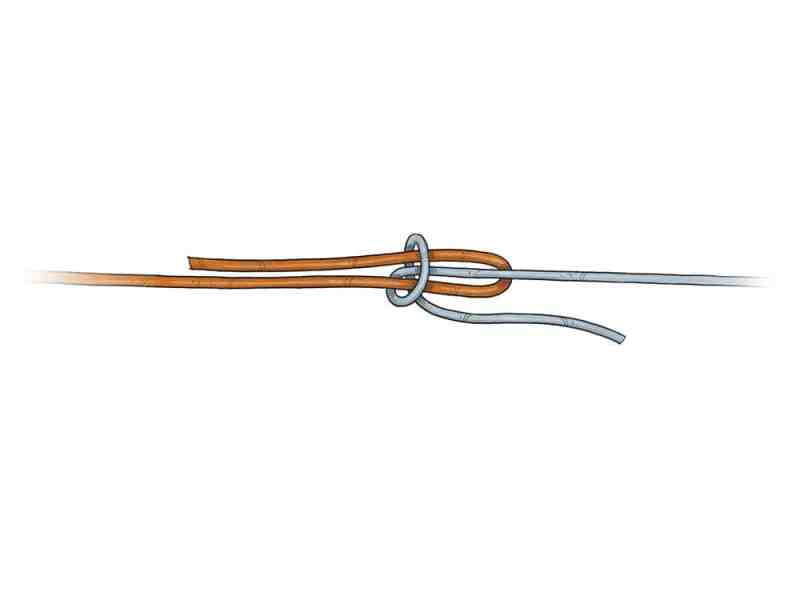
Step 2
Pass the loop end through the crossing loop six times. Pull the loop end and standing line snug (do not tighten too much).
Joe Mahler / www.joemahler.com
Step 3
Repeat steps 1 and 2 using the single line in the opposite direction. Lubricate both knots.
Joe Mahler / www.joemahler.com
Step 4
Pull on the two standing lines to slide the two knots together. Tighten by pulling on all strands. Trim the tags.
Joe Mahler / www.joemahler.com
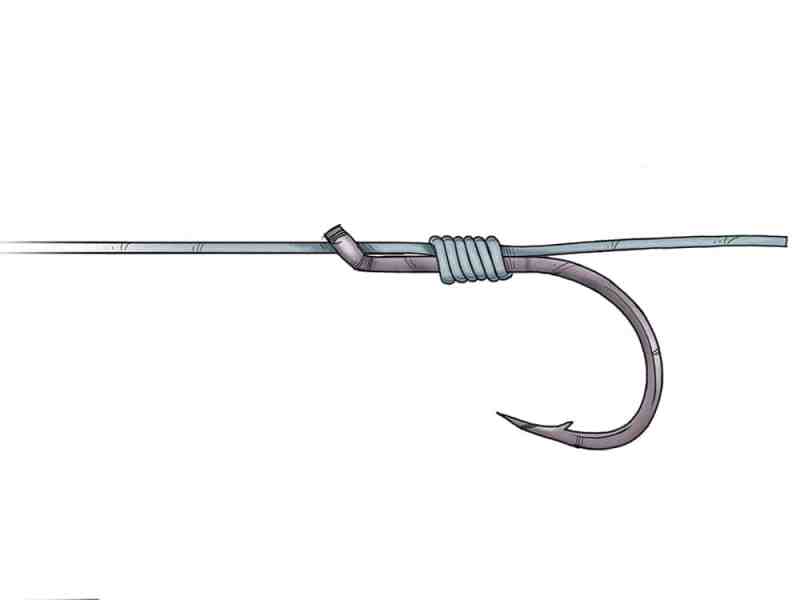
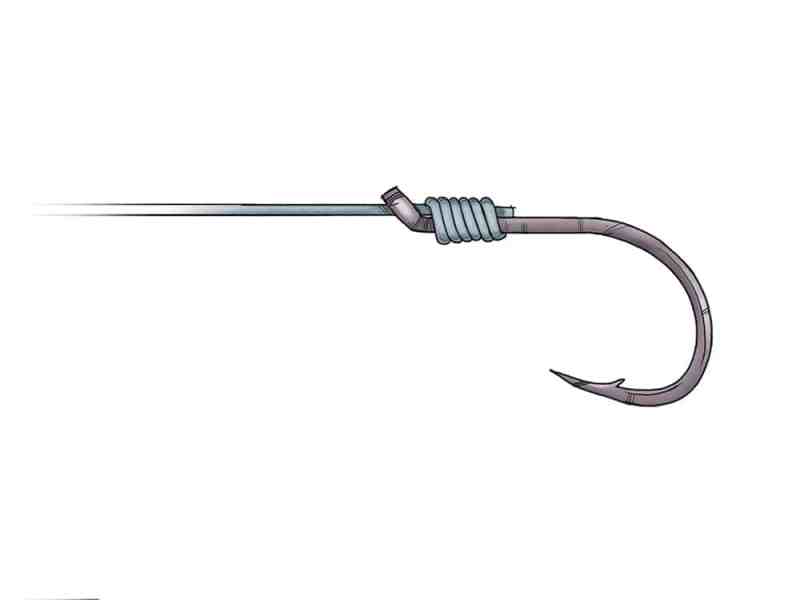
Snell Knot
Snell Knot
Joe Mahler / www.joemahler.com
This snell knot will keep the hook aligned with the leader. Snell knots are ideal for circle hooks with offset eyes when using live bait. Some anglers swear by the fast-snell knot when tying on circles for large gamefish such as tarpon.
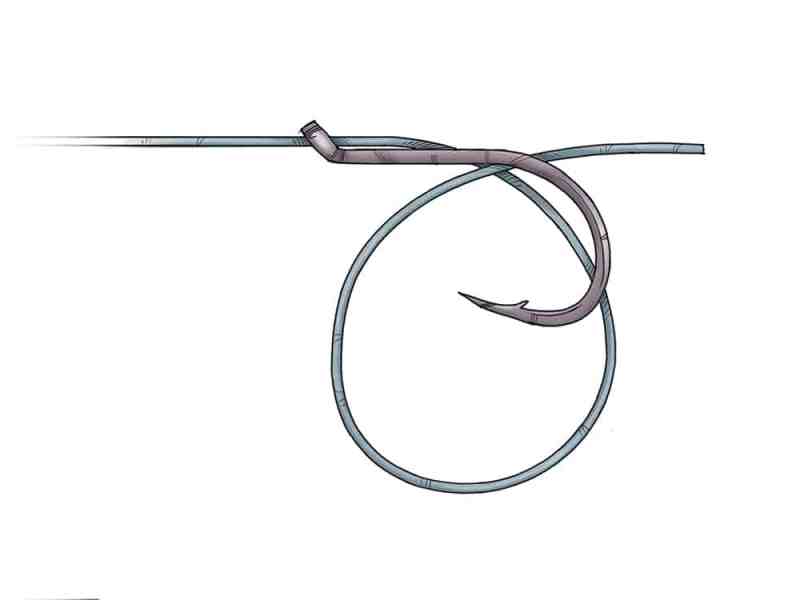
Step 1
Insert the tag end through the hook eye. Form a loop with the tag end beyond the bend of the hook.
Joe Mahler / www.joemahler.com
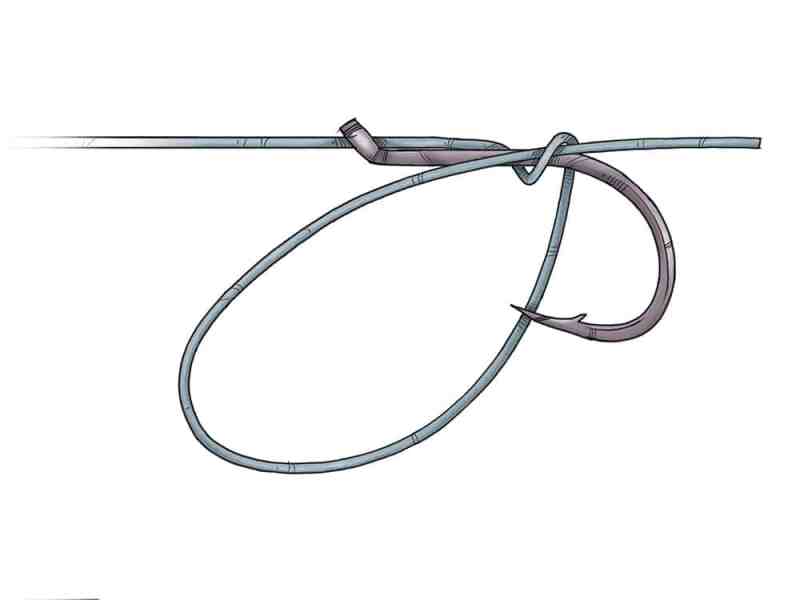
Step 2
Grasp the tip of the loop and wind it around the hook shank and line.
Joe Mahler / www.joemahler.com
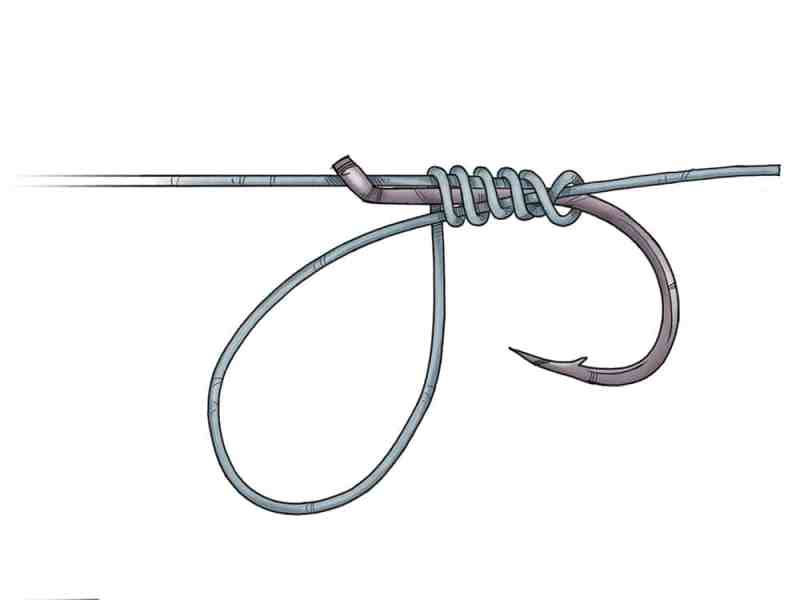
Step 3
Snell Knot – Step 3
Wrap the tip of the loop toward the hook eye five more times, passing the tag and back of the hook through the loop each time. Place the wraps as close to each other as possible.
Joe Mahler / www.joemahler.com
Step 4
Pull the tag end steadily to close the wraps around the hook.
Joe Mahler / www.joemahler.com
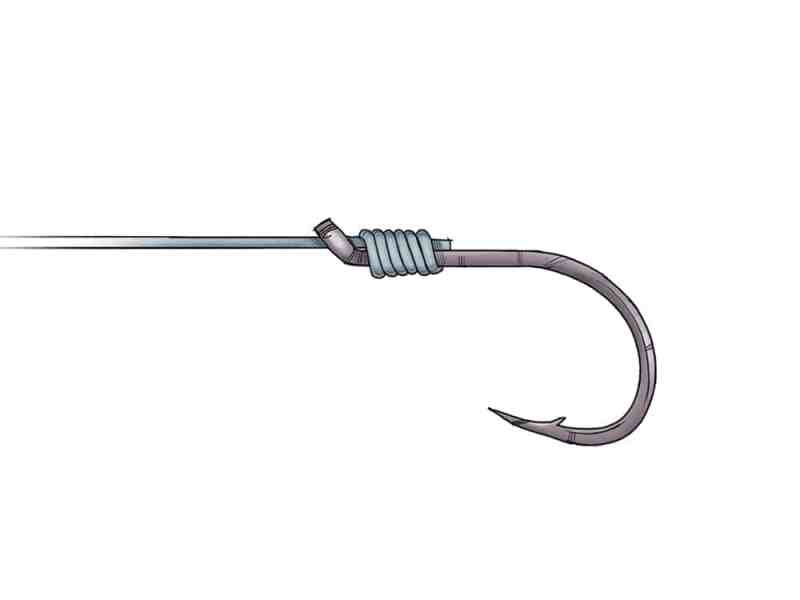
Step 5
Pull the standing line so that the snell is snug against the eye of the hook.Tighten the knot by pulling on both the tag and the standing line. Trim the tag.
Joe Mahler / www.joemahler.com
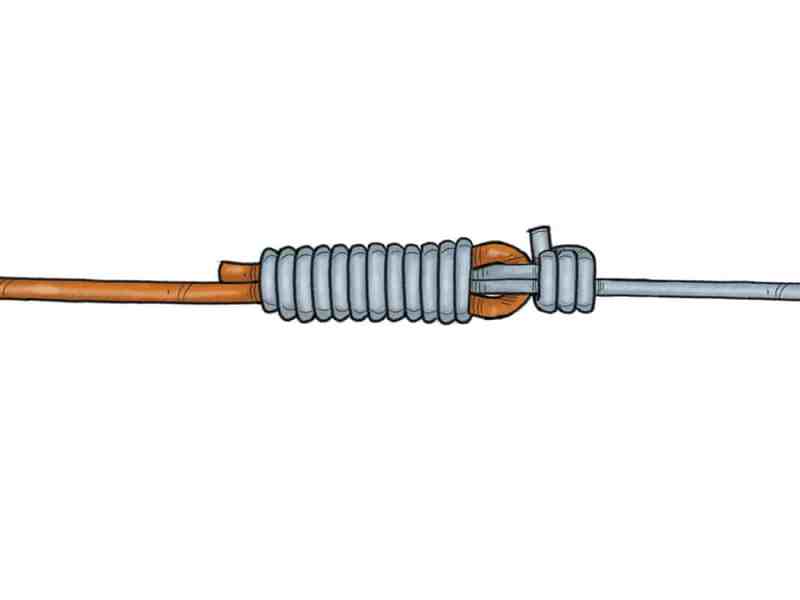
Haywire Twist
Haywire Twist
Joe Mahler / www.joemahler.com
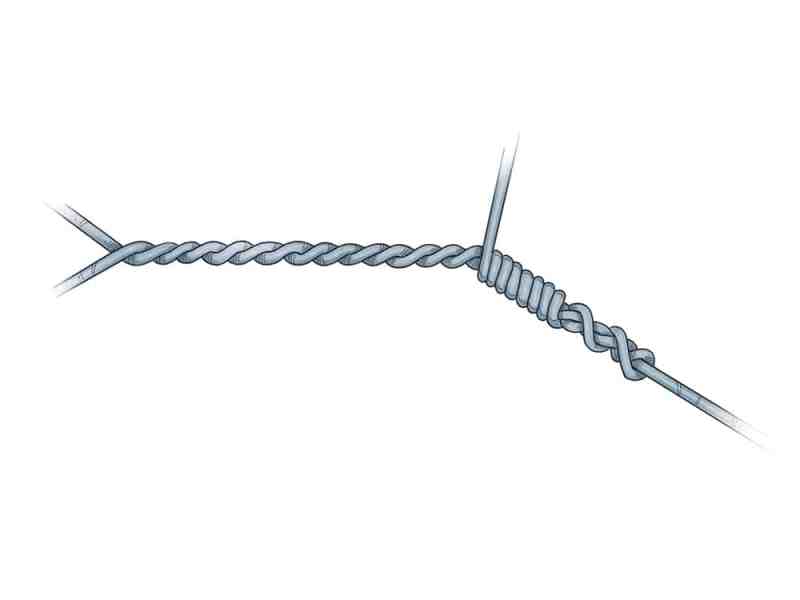
The haywire twist is the go-to connection when targeting toothy critters with single-strand wire leaders. It is versatile and can be used on either end of the leader, but care must be used when breaking off the tag ends to avoid sharp, potentially dangerous stubs of wire.
Step 1
Place the tag end of the wire through the eye of the hook. Double the wire back 5 to 6 inches, crossing the tag over the main strand. Pinch with you thumb and forefinger to lock in place.
Joe Mahler / www.joemahler.com
Step 2
Hold the wire firmly and make a half turn with the main strand and the tag at right angles to each other. The tag and main strand must be held so that an “X” forms at each half turn. Make three and a half turns.
Joe Mahler / www.joemahler.com
Step 3
Finish the twists so the tag end is straight, and at a 90-degree angle to the standing portion of the wire, then make four tight, close wraps with the tag end.
Joe Mahler / www.joemahler.com
Step 4
Take the end of the tag and form a small handle at a 90-degree angle to the knot. Grasp the handle firmly and move it in a circular motion parallel to the main strand, breaking the wire flush with the last wrap.
Joe Mahler / www.joemahler.com
Step 5
Make sure the wire breaks cleanly. Never trim the tag with cutters, as you’ll be left with a sharp tag sticking out that can easily cause injury.
Joe Mahler / www.joemahler.com
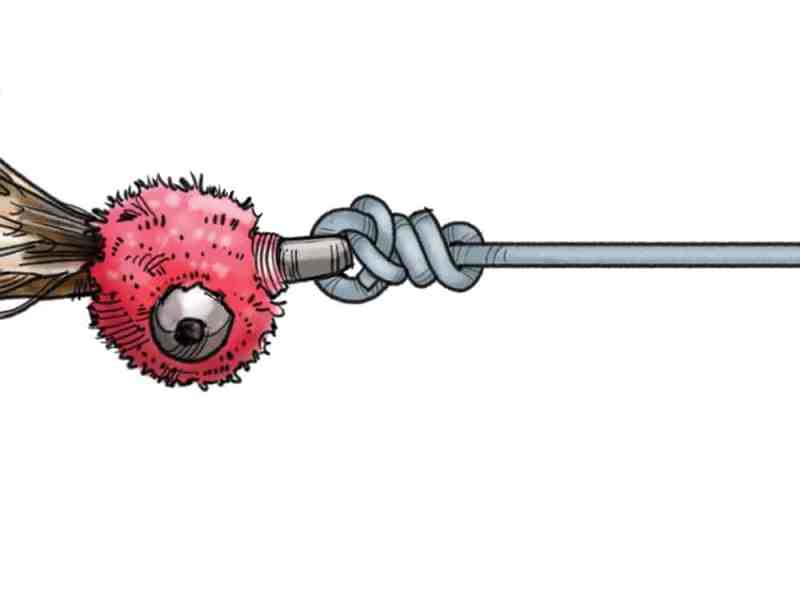
Improved Clinch Knot
Improved Clinch Knot
Joe Mahler / www.joemahler.com
The improved clinch knot, to me, is the ’57 Chevy of knots. Although there are sleeker and stronger knots, this one is the classic. The improved clinch works well with both monofilament and flourocarbon when properly tied, seated and tightened. It does not test a strong as some other knots, but many pros favor it because they can ties it quickly and more consistently than other, more complicated knots.
Step 1
Thread the line through the hook eye and begin to wrap it around the standing line.
Joe Mahler / www.joemahler.com
Step 2
Make a total of four to six turns around the standing line (depending on diameter) and pass the tag through the loop that was formed near the eye.
Joe Mahler / www.joemahler.com
Step 3
Pass the tag through the second loop that you just formed. Lubricate and pull gently on the tag to pull the knot together. Make sure that the coils do not overlap.
Joe Mahler / www.joemahler.com
Step 4
Tighten the knot by pulling on both the standing line and the tag. Trim the tag.
Joe Mahler / www.joemahler.com
The Non-Slip Loop
The Non-Slip Loop
Joe Mahler / www.joemahler.com
A loop knot allows the most movement and the non-slip is the easiest and best of all loops. When tied properly, the tag points toward the hook and is less likely to pick up grass or other flotsam. In my opinion, the smaller the loop, the better.
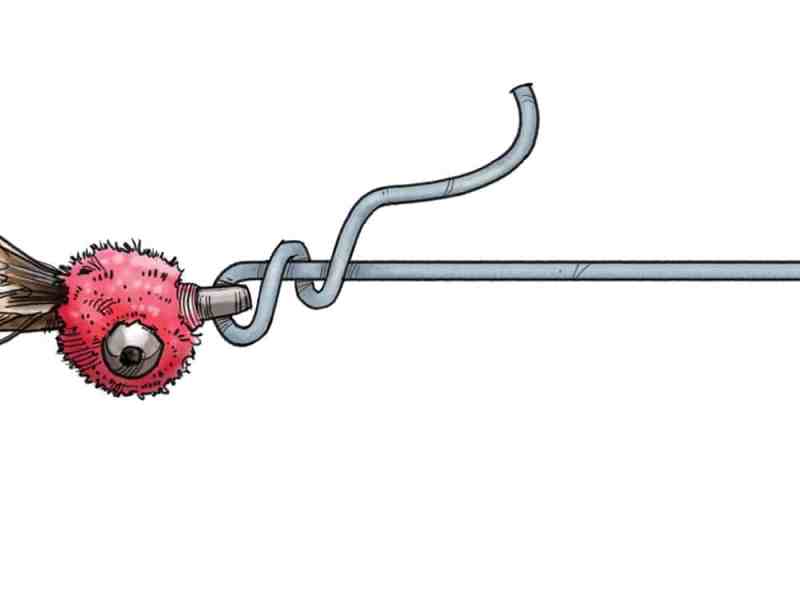
Step 1
Tie a simple overhand knot in the line before passing the tag end through the eye of the hook. Do not tighten.
Joe Mahler / www.joemahler.com
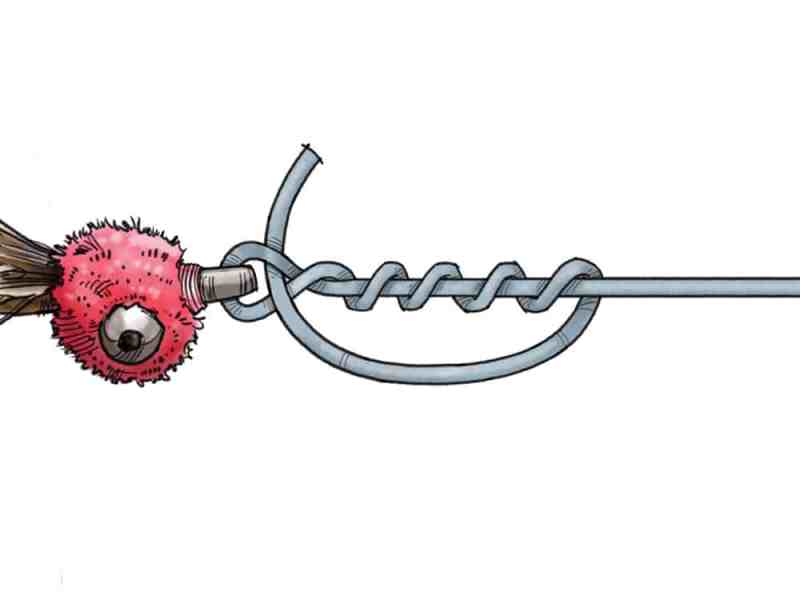
Step 2
Pass the tag out through the overhand knot the same way it came out. Pull gently on the tag until the overhand is near (1/4 inch or less) the eye of the hook.
Joe Mahler / www.joemahler.com
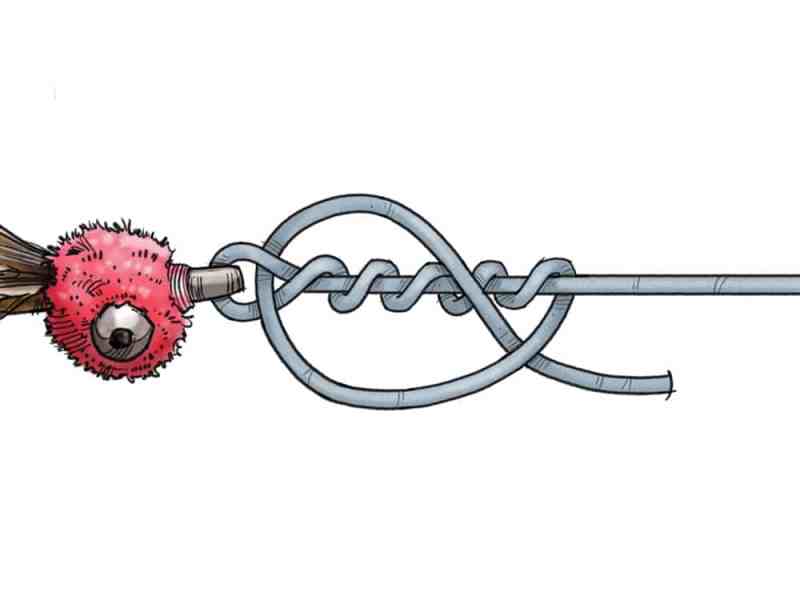
Step 3
Make one to three turns (more for lightest lines, less for heavier) around the standing line, working towards the hook. Pass the tag through the original overhand knot. Lubricate.
Joe Mahler / www.joemahler.com
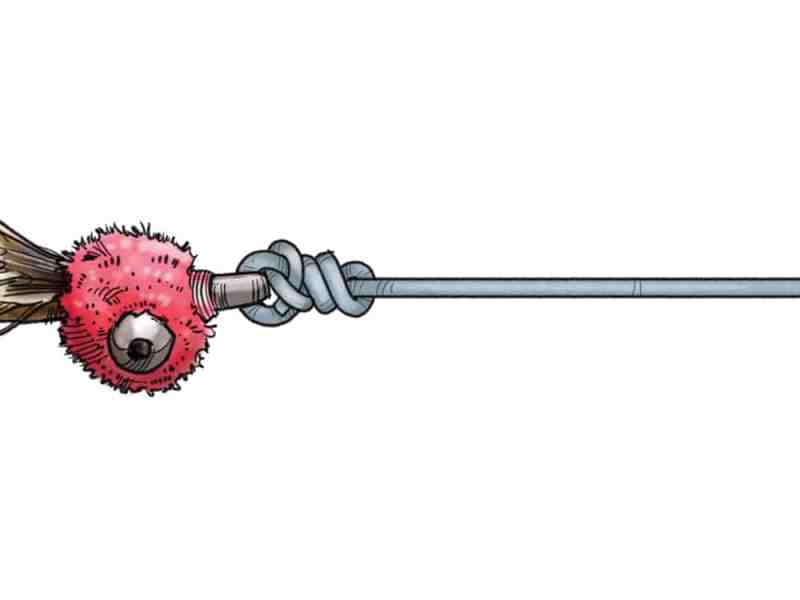
Step 4
Tighten by pulling on the standing line, the tag, and the fly simultaneously. Trim the tag.
Joe Mahler / www.joemahler.com
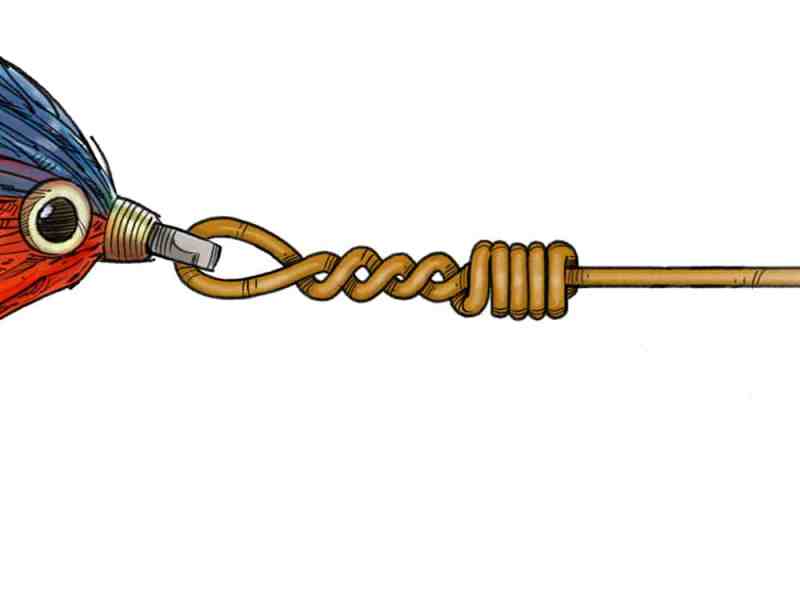
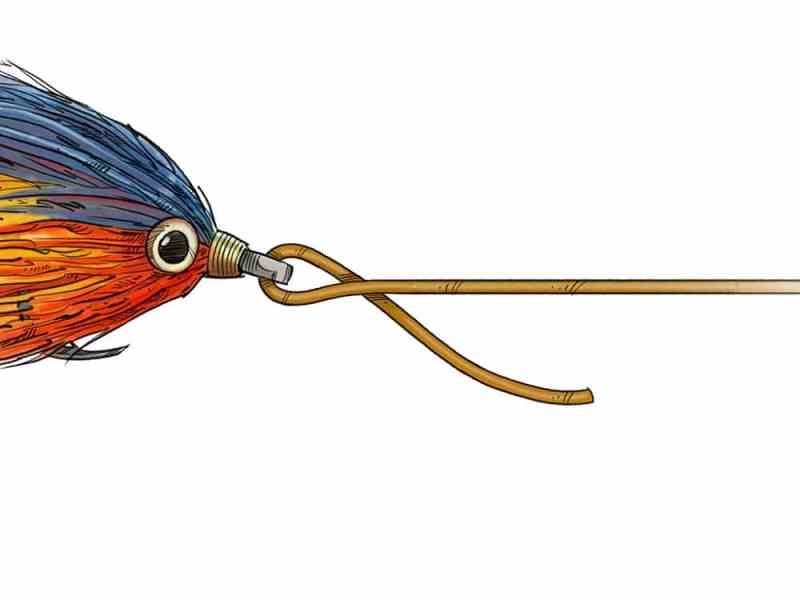
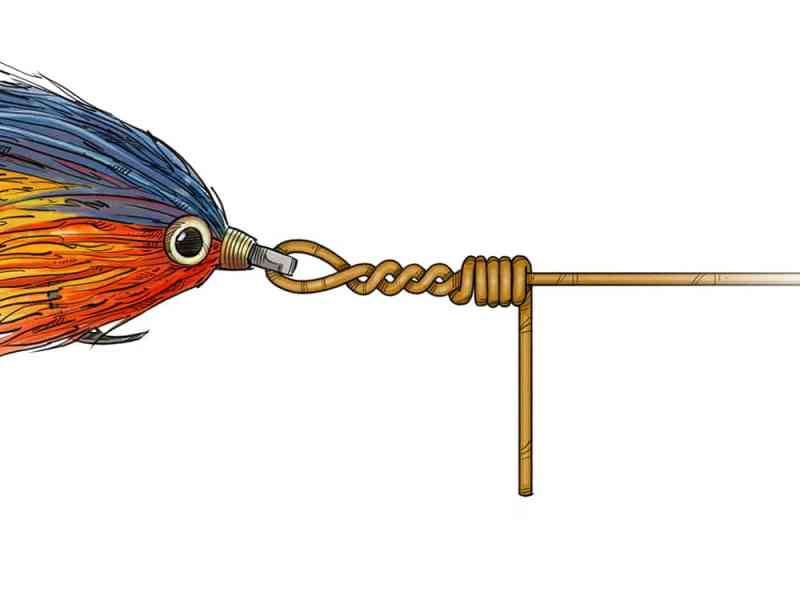
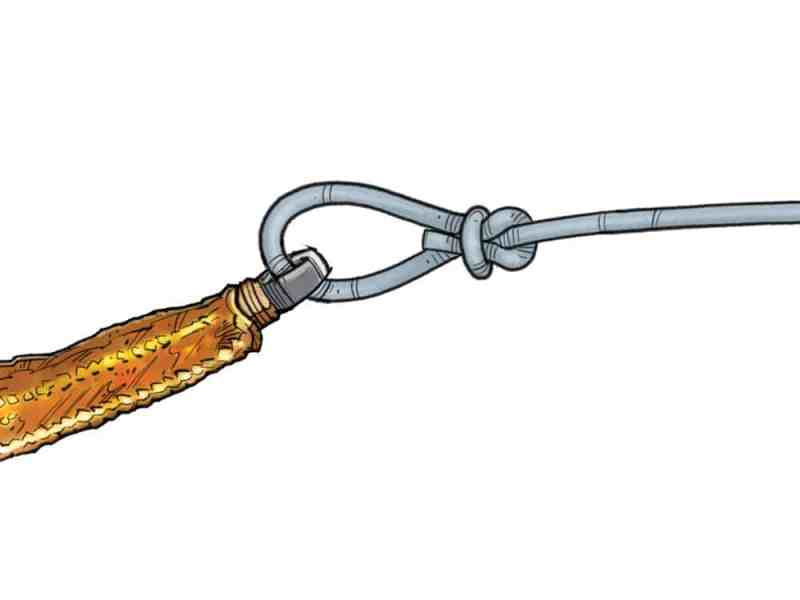
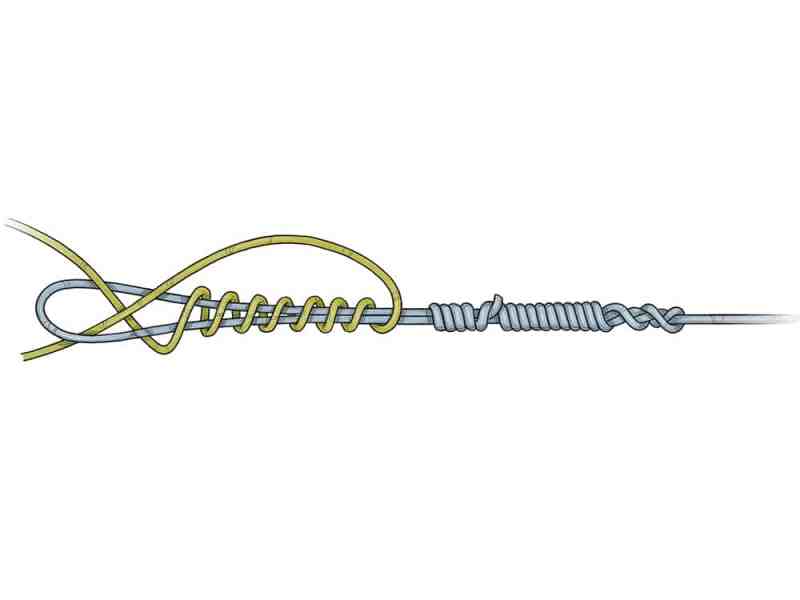
Bristol Knot
Bristol Knot
Joe Mahler / www.joemahler.com
The Bristol Knot (also called No-name Knot) provides a streamlined connection between a double line and leader that passes through the rod guides smoothly. It is highly effective for attaching super-braid double line to a monofilament leader. It also is the quickest way to attach leader material to a class tippet loop when fly fishing.
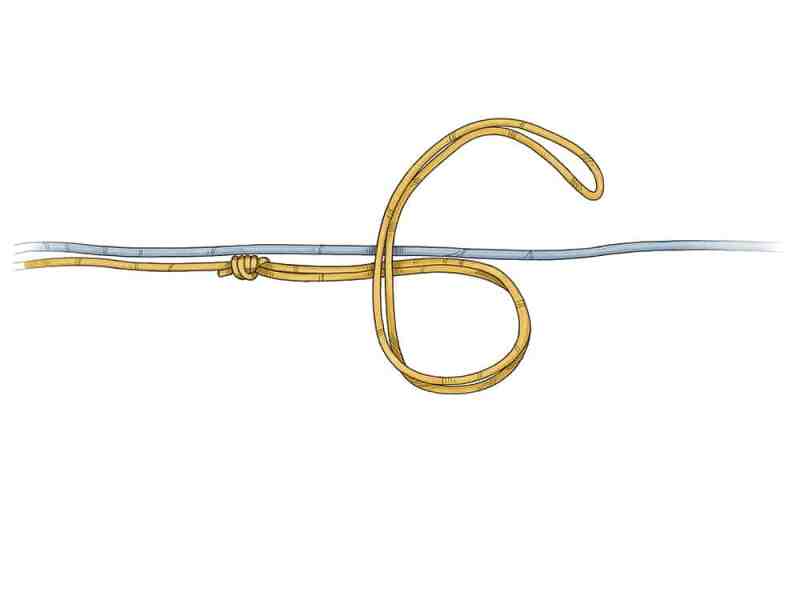
Step 1
Form a loop in the line with a Bimini twist or other double-line connection. Pass the end of the leader material through the loop and pull 10 inches through.
Joe Mahler / www.joemahler.com
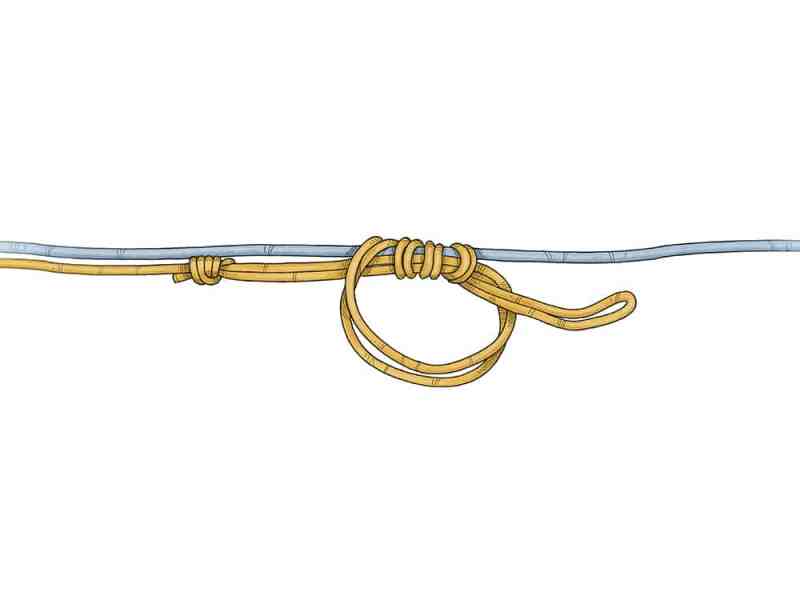
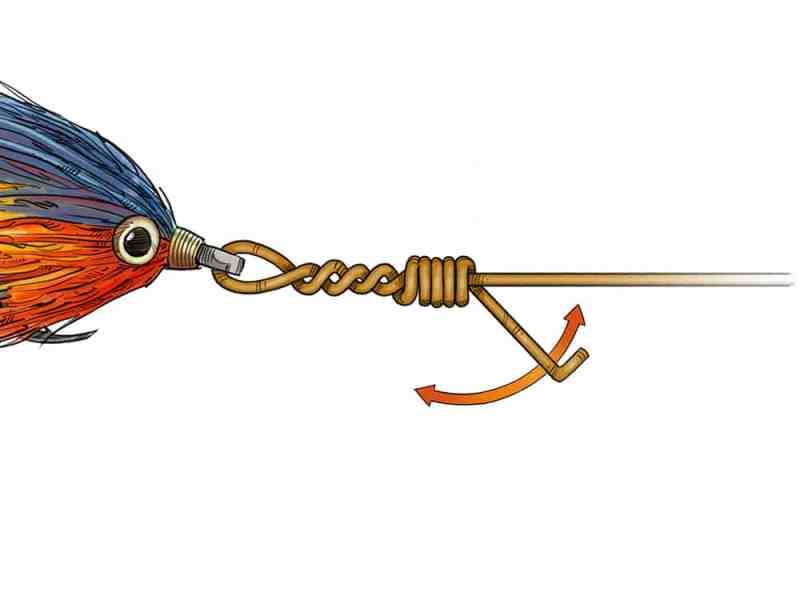
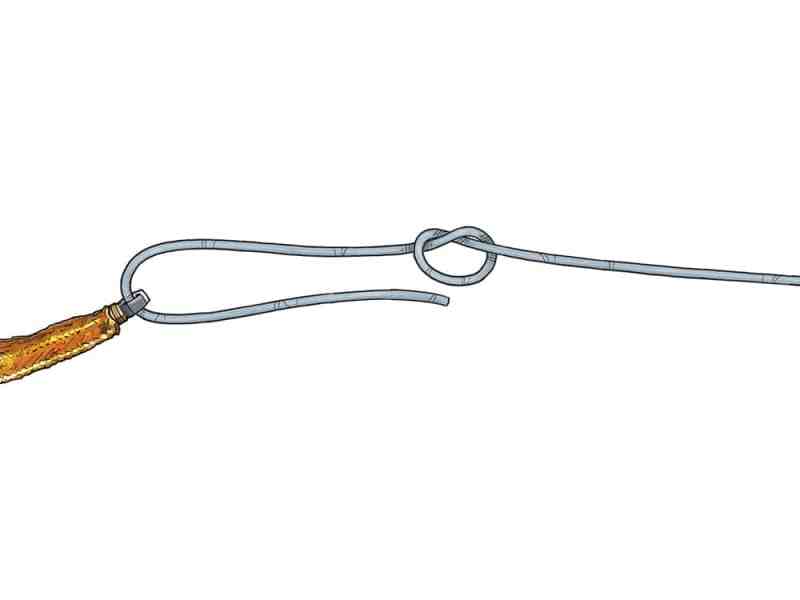
Step 2
Wrap the leader material around the loop strands five to seven times.
Joe Mahler / www.joemahler.com
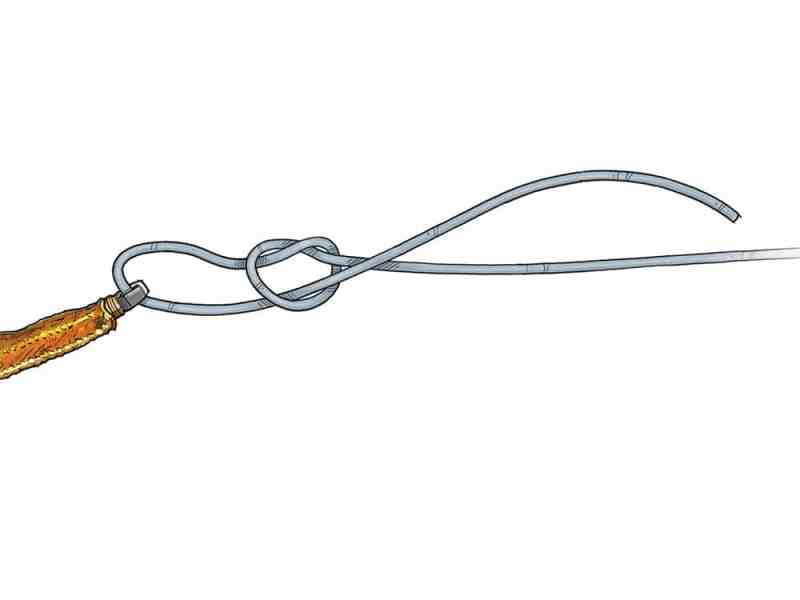
Step 3
Feed the tag end between the first wrap and the loop. The tag should exit the loop in the opposite direction from the one it entered in.
Joe Mahler / www.joemahler.com
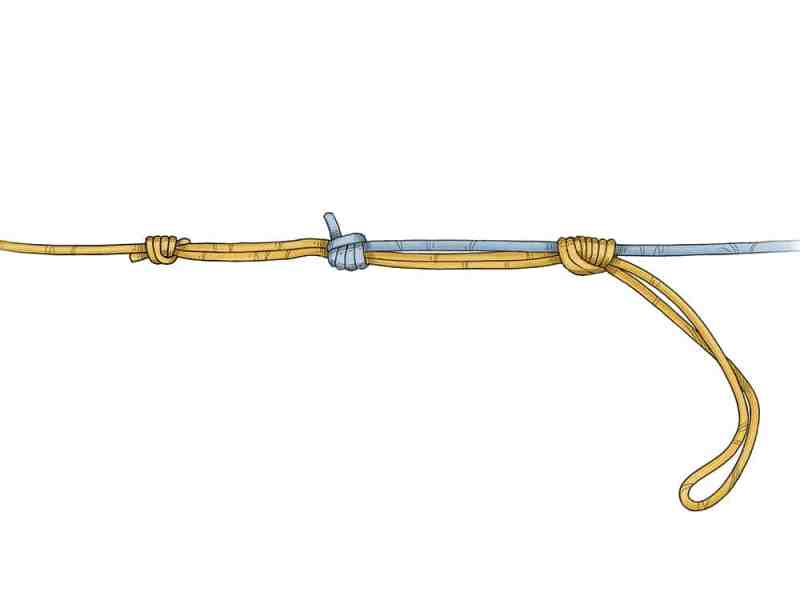
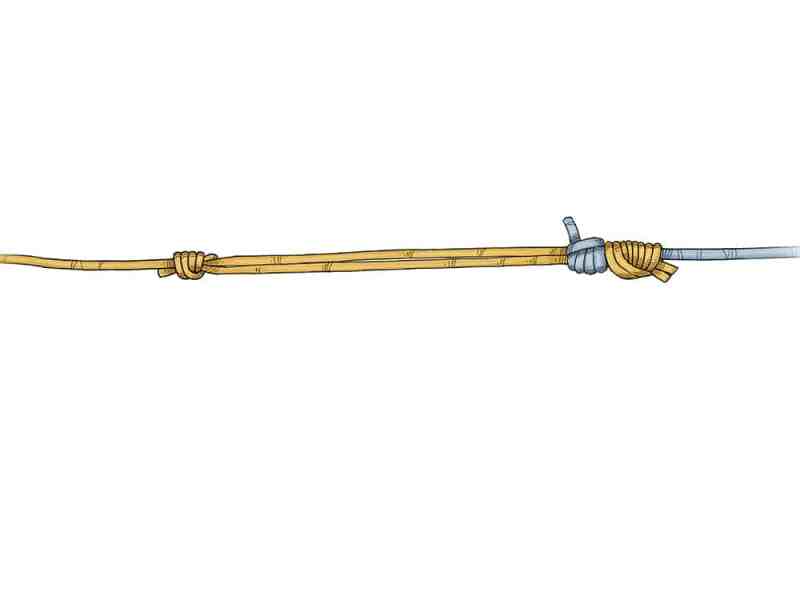
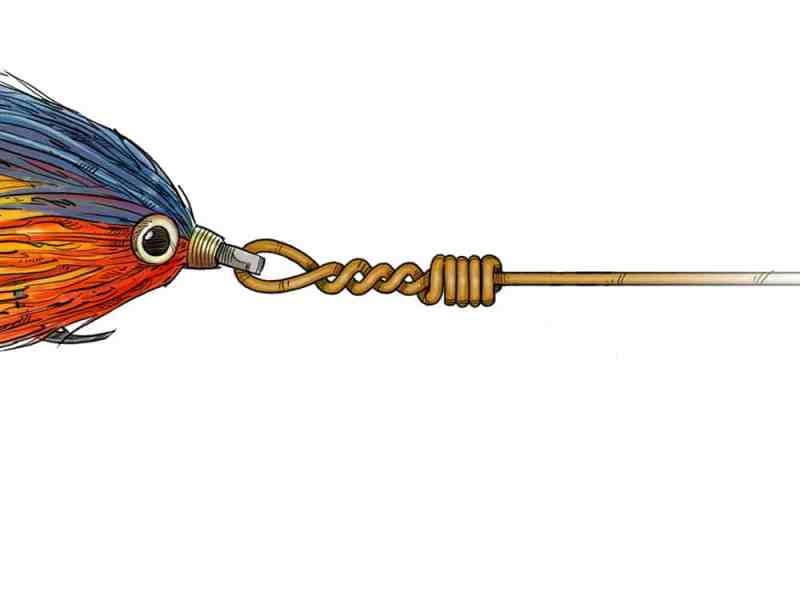
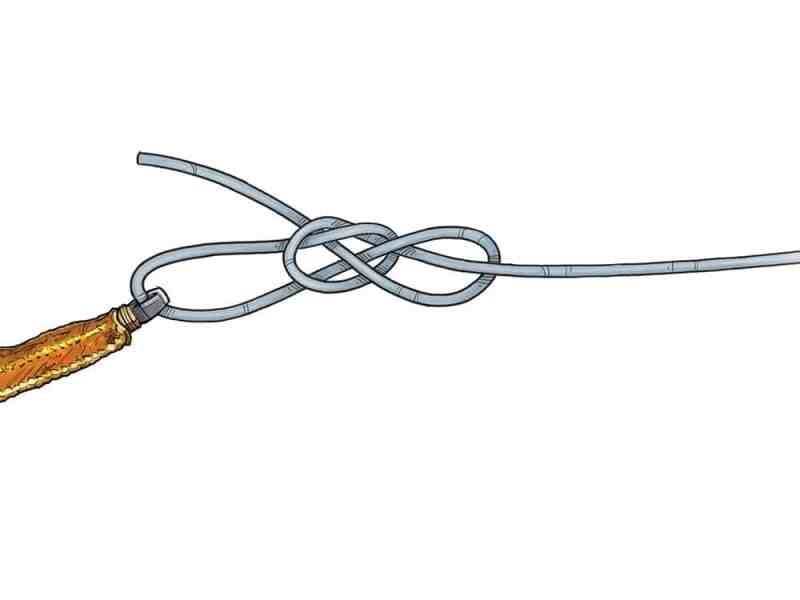
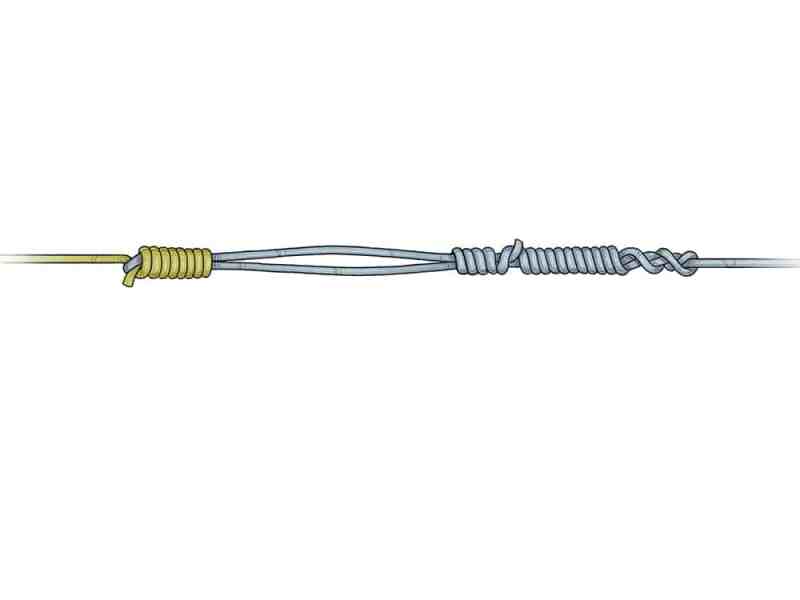
Step 4
Tighten the wraps by pulling steadily on both strands of the loop and both strands of the leader material. Trim the tag.
Joe Mahler / www.joemahler.com