Hard-core offshore anglers often utilize loops on their fishing lines. These loops aren’t the result of lines that were badly twisted by trolling without swivels, but rather they are waxed-thread markers and attachment points positioned securely to fishing lines at precise intervals.
These loops may be attached to outrigger clips to ensure trolling baits and lures ride at specific distances behind the boat, or they may secure weights or lights to fishing lines, such as when drifting for swordfish, sharks or tuna. Streamlined loopless markers serve as visual indicators as to how many feet or yards of line are off the reel and lend the precision required when wire-line trolling for wahoo and grouper, and even drifting for big game fish. Both looped and loopless markers play an instrumental role in offshore fishing.
Harry Vernon III likes to get looped when he’s fishing, figuratively. A proprietor of Capt. Harry’s Fishing Supply in Miami, Vernon uses loops to attach his fishing lines to outrigger clips, as well as weights and lights to his swordfish tackle. Nicknamed the Wire-Line Wizard, Vernon also uses loopless markers at 50- and 100-foot increments on his wire outfits so, whether he’s pulling fast for wahoo or moderately for grouper, he knows exactly how much wire line is in the water. This helps him compute just how deep the lure is riding given the weight and amount of wire line in the water, the weight of the lure and the speed of the boat. He’s deadly precise and has the catches to prove it. In fact, he’s fresh off a victory in a Bahamas winter wahoo tournament.
Hang on Loopy
Vernon explains how to create and tie a marker onto a fishing line where it won’t slip or fail. Master the following steps and you too can set your baits with precision accuracy.
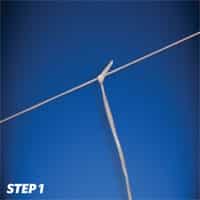
LOOP MARKER
| Tie the waxed thread to the fishing line with an overhand knot.Add a half hitch above the overhand knot. It is important to keep tension on the fishing line and to securely snug down the half hitch to prevent it from slipping. It is also important that the second half hitch is cinched tightly over the tag end of the initial half hitch on the line to provide a solid bite and a better holding foundation. |
| | Add another 15 to 20 half hitches. |
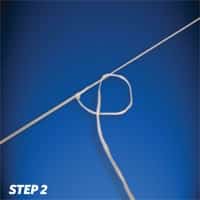
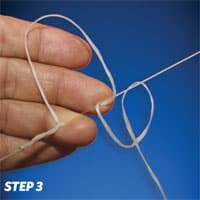
| | Make the final half hitch, but don’t cinch it. Instead, adjust the hitch to form the desired size of loop and then tie two half hitches on the line to establish the loop size.|
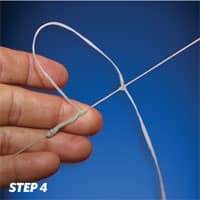
| | On the outside of the loop, continue with 15 to 20 more half hitches.|
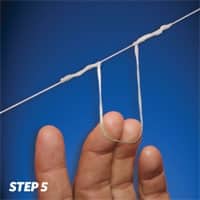
| | Complete the construction with a reverse half hitch wrapped around the fishing line six times before you pull it tight. Pull tag until it cinches down over itself just inside the end of the marker. This will prevent the connection from unraveling in the water or when running through the rod guides. Trim the tag end as close to the knot as possible. |
|
****
LOOPLESS MARKER
| Repeat all but Step 3 for a more streamlined, loop-free marker (A). |

| | Use permanent markers to color-code the individual line markers (B). For example, color the initial marker blue and the next red, followed by black, orange, etc. This will enable you to quickly determine if you have 100, 200, 300 or 400 feet of line out (if you’ve measured in 100-foot increments). Go beyond that, and you can use two colors per marker – for example, red and blue, orange and black.|

|
For wahoo, after the initial 100-foot marker, Vernon marks his wire line in 50-foot increments. In addition to color-coding them, he ties a 2-inch marker every 100 feet and a 1-inch marker at every 50 feet. This arrangement provides color and size to help him quickly determine the amount of line in the water.