When I first started tying saltwater flies, learning the techniques for a proper whip finish took a back seat to other fly-tying skills that produced more visible and appealing results. Let’s face it, when is the last time you looked at a completed fly and thought to yourself, “Wow, what a great whip finish!”? Just as a fastball pitcher should also work on a good curveball and change-up to complete his arsenal, a fly tier needs to learn a good whip finish to complement his other fly-tying skills.
Before learning a proper whip, the only finishing skill I had in my arsenal was to simply complete the fly, add a drop of Super Glue over my final wrap and then snip the remaining thread. This method was very messy and would often ruin the appearance of what could have been a nice-looking fly. Finally, someone attempted to walk me through whip finishing with a tool. After about an hour of thread breaking and slipping, though, my teacher thought I was hopeless. He finally suggested just learning a single half hitch. It was quick, easy and somewhat effective, and that’s exactly what I did for a long time. However, I repeatedly found myself tossing fly after fly in the trash due to severe unraveling problems. At this point, I knew I was going to have to shape up or ship out and whip myself into shape.
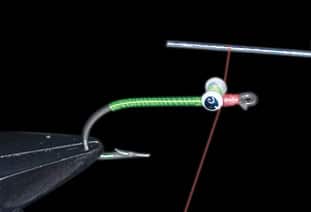
What is a whip finish, anyway? Essentially, (by my method) a whip finish is a series of half hitches strategically placed in succession. There are a couple of advantages to a true whip finish, especially compared to my old way of using single half hitches. The first and possibly the biggest advantage is that a true whip finish allows for a much tighter half hitch. The second advantage is that it really lets you be precise with the placement of these hitches, allowing you to taper the terminal end of the fly head. By placing them in succession you are actually able to bury the end of the thread, leaving virtually no tag end at all. The absence of a tag makes for a clean, store-bought look and provides a perfect canvas for epoxy or head cement.
Although there are several different methods, here is mine:
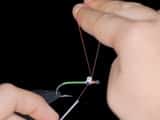
| Step 1: With your right hand, place your index and middle finger in front of the thread. |
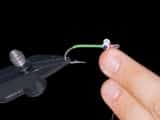
| |Step 2: Twist your fingers toward you and simultaneously bring the tip of your bobbin closer to the eye of the hook. This movement should form a triangular shape with the thread.|
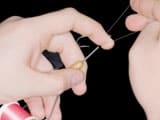
| |Step 3: Place the triangle-shaped loop over the eye of the hook, twist your wrist toward you and allow your index and middle fingers to switch places.|
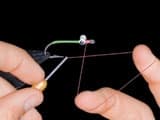
| |Step 4: At this point, your thread should still be in a triangular shape on top of the hook (your hand should be facing down). Stick your left index finger through the triangle formed by your thread and hold the leg of thread farthest away from you. Without moving your left index finger, use your right index and middle fingers to rotate the triangle of thread to the underside of the hook eye.|
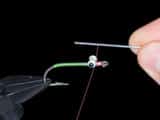
| |Step 5: With your right index and middle fingers, rotate the triangle of thread so that your fingers are above the eye of the hook. Repeat steps 1 through 4, making sure your index and middle fingers are facing down. Pull down to tighten and finish, using a bodkin to seat the last hitch.|
|
Don’t think of the whip finish as being difficult – it’s just a bit confusing. It was something I had to watch many people do over and over again before I finally got it. Watching so many people may have been my biggest problem, in hindsight. Keep in mind, there are several ways to whip finish using your fingers. Don’t try to combine one person’s method with another’s, as this will only confuse the issue.
The whip finish is not the glory work of fly tying, by any stretch. However, it’s a very efficient and necessary technique that will keep your head in the game when the bite is on.